

Last month, we demonstrated how to interface our NetBurner modules with the MPU9250; a 9-axis IMU that features a gyroscope, an accelerometer, and a magnetometer on a $15 breakout board offered by SparkFun. This handy little gadget allows you to track movement data, and was used by our intern, David, to adjust the heading of an autonomous vehicle he was working on.
Prior to that, we featured an article where we expounded on how to use WebGL, websockets, and the EFFS-FAT file system provided by NetBurner to visualize sensor data using a 3D model and some randomly generated data.
This month, we are going to combine these wildly wonderful tutorials, and dig into how you can visualize the rotational data from the IMU using WebGL with a websocket connection. Since the gory details for each of these projects can be found at the links above, we are going to focus on the glue that binds these two together. Loving you the way we do, we went ahead and combined the necessary pieces of these projects into its own glorious repo, which you can find here.
This code can be imported into an NBEclipse project, or you can compile it from the command line using make, and then load the resulting .s19 file (WebGlWithImu_APP.s19 if you didn’t get handsy with the makefile) using our AutoUpdate tool (located in <nburn_install>\pcbin\).
As mentioned above, there isn’t a tremendous amount of original code in this new project. By and large, it’s just the two individual projects smooshed together like a bunch of sardines in a can of code. The one thing that did need to be addressed was sending actual data to our visualization, instead of the fake data we were generating before.
Because we now have IMUSampleLoop() do the heavy lifting in terms of reading data values from the IMU and turning it into data we can actually use in the form of a quaternion, we removed UpdatePosAndRot() from main.cpp. The change from Euler angles to quaternions is actually very beneficial for our application as it avoids gimbal lock, which is a common problem where you end up losing a degree of freedom during your rotations.
If you look at the new and improved SendWebSocketData(), you will notice that when adding the rotation values to the JSON blob, we are now using the global variable q, which holds our quaternion data.
Void SendWebSocketData()
{
   // Prevent the values from changing in the middle of trying to
   // assign them later by storing them in a local variable.
   USER_ENTER_CRITICAL();
   float q0 = q[0];
   float q1 = q[1];
   float q2 = q[2];
   float q3 = q[3];
   USER_EXIT_CRITICAL();

   <Some Code>

   jsonOutObj.AddObjectStart("RotUpdate");
   jsonOutObj.Add("w", q0);
   jsonOutObj.Add("x", -q2);
   jsonOutObj.Add("y", -q3);
   jsonOutObj.Add("z", q1);
   jsonOutObj.EndObject();

   <More Code>
}
If you look at this code closely, you’ll notice that we aren’t assigning the quaternion values from the IMU loop to their respective axis in our function call above. This is because the IMU defines the z axis as the vertical axis in the coordinate space, while in computer graphics, this is usually reserved for the y axis. We need to make a similar adjustment for the x and z axes. Finally, we need to negate the values of the x and y axes to correctly correspond with their representation in our visualization. You will also notice that we are setting the position to 0. For the autonomous car project, we only needed to determine the rotational data for the IMU, not the positional change.
We now need to change SdCardFiles/index.html so that it will accept the quaternion values in place of the Euler angles we were using previously. This happens in three places. The first is when we declare the rotation values right underneath the <script> tag. We simply declare a variable, rotW, to handle the additional value. Similarly, we add the assignment to this variable in our websocket’s onmessage event with the line:
rotW = updateData.RotUpdate.w;
Lastly, we update our animate() function to assign the quaternion values to the gadget. Because we were using Euler angles previously, this was the largest change in our html file, and now looks like the following:
function animate() {
      camera.lookAt(new THREE.Vector3(0, 0, 0));
      requestAnimationFrame(animate);

      // Animate our gadget
      if (loadedGadget) {
         gadget.quaternion.x = rotX;
         gadget.quaternion.y = rotY;
         gadget.quaternion.z = rotZ;
         gadget.quaternion.w = rotW;

         gadget.position.x = posX;
         gadget.position.y = posY;
         gadget.position.z = posZ;
      }

      renderer.render(scene, camera);
   }
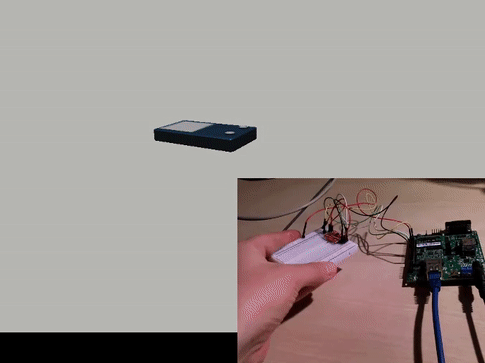
When the project is built and loaded to the module, the fruits of our labor can be seen in the short video clip below.
With these small changes covered, that just about brings this tutorial to a close. Hopefully you now feel armed and ready to add some killer data visualizations to your own projects, especially where IMUs might be involved. Let us know what you come up with in the comments below, or on the community forums!
2 thoughts on “Visualizing the MPU9250 IMU with WebGL”
Dear netburner,
I want to run this project by using make in ubuntu 18.04
But when I type make in terminal
The error message prompt out: No rule to make target ‘/make/main.mak’
how can I fix it? I will be appreciate the reply.
Best regard!
Hi Mike!
Thank you for taking an interest in our project! In order to build the project as is, you need to have installed our NNDK, which includes the compiler needed to build applications for our platforms. If you want to run the code for other hardware with another compiler, you will need to make the appropriate changes to the makefile in the project.
Kind Regards,
Jon