

Inertial Measurement Units, or IMUs, are ubiquitous in robotics applications but are also useful for any project in which orientation information or motion detection is needed. However, IMUs are notoriously difficult to interface with. The MPU9250 is an IMU that features a gyroscope, accelerometer, and magnetometer, and is commonly chosen due to its precision-to-cost ratio and availability. As of this writing, a 9-axis (9-DOF) IMU breakout board, complete with a 3-axis accelerometer, gyroscope and magnetometer, can be purchased on SparkFun for less than $15!
As part of my intern project developing NetBurner’s 1/8-scale autonomous vehicle entry in the 2018 Sparkfun Annual Autonomous Vehicle Challenge (AVC), I ported Kris Winer’s MPU9250 code written for Arduino to NetBurner; changing functions involving delays, timing, and communication protocols. I added:
- a) The option to save calibration values in flash memory.
- b) A method of controlling the filter update rate using a PIT timer.
- c) A way to zero the heading.
The MPU9250 driver/example code for NetBurner assists with the following process:

The heading produced by this process, along with an odometer, allowed me to track the car’s (X,Y) position on a 2D Cartesian plane and accurately perform tasks like turning 10 degrees to the right to avoid an obstacle.
Although it hasn’t been tested on all NetBurner platforms and is not a guaranteed solution, using this code will save the large time investment required to understand and implement this procedure. The only constants that the user needs to edit are magnetic declination (varies by geographical location and over time) and update rate.
On the NANO54415 NetBurner Embedded System on Module, each update take about 3ms. This includes I2C transactions, Madgwick filter update, and conversion to roll/pitch/yaw. Updating at 66 Hz provides sufficiently low latency for my autonomous vehicle requirements, but increased update rates provide decreased latency in achieving a precise and stable heading. Note that the code as written requires a dedicated DMA timer (HiResTimer) for delays and stopwatch timing.
Setup and Testing
To validate that the code is actually working correctly without building your own autonomous vehicle from the ground up, we have a simple setup shown below that will let us connect the IMU to the NANO54415 using a NANO development board and a breadboard. The connection is pretty simple and is outlined and illustrated in the images below.

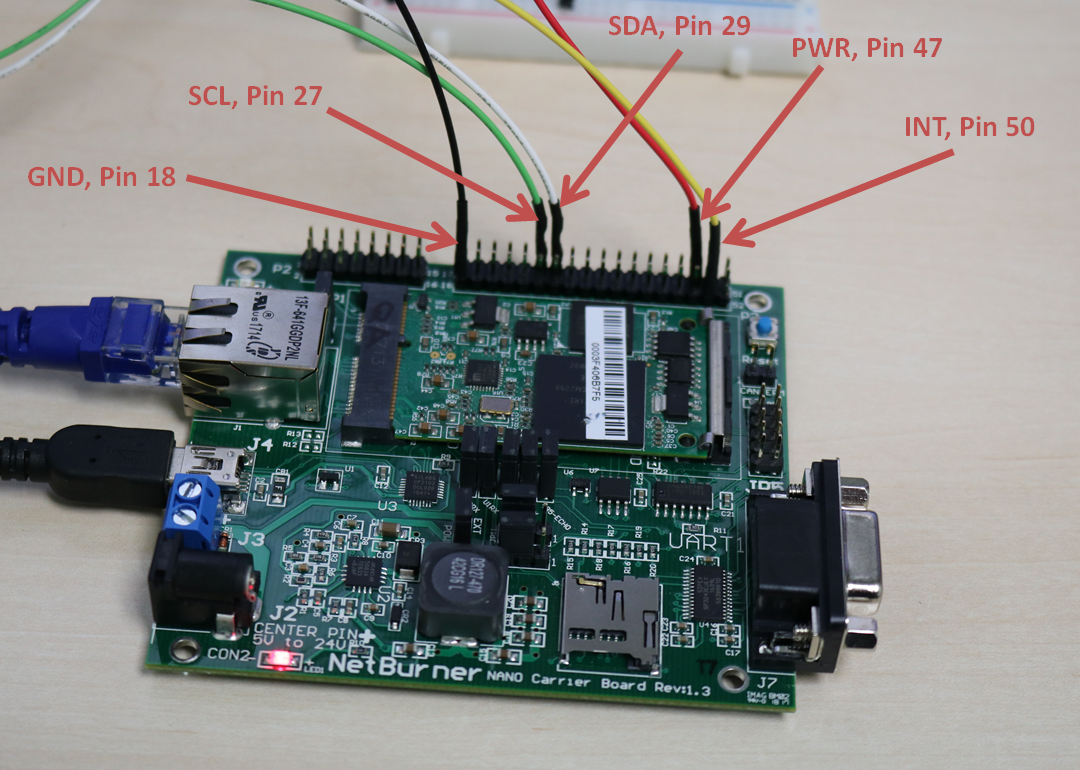
From the image of the development board, we can see that we are connecting five signals from the IMU to the development board which facilitate the I2C signal and IRQ. These are:
- Ground, which is connected to pin 18
- PWR, which is connected to pin 47
- SCL, which is connected to pin 27 and is used for I2C
- SDA, which is connected to pin 29 and is used for I2C
- INT, which is connected to pin 50 and is used for IRQ

For the breadboard, we have pretty much the same thing, with one extra twist. The VDD and the VDDIO are jumpered together, and then both are connected to the PWR signal from the development board.
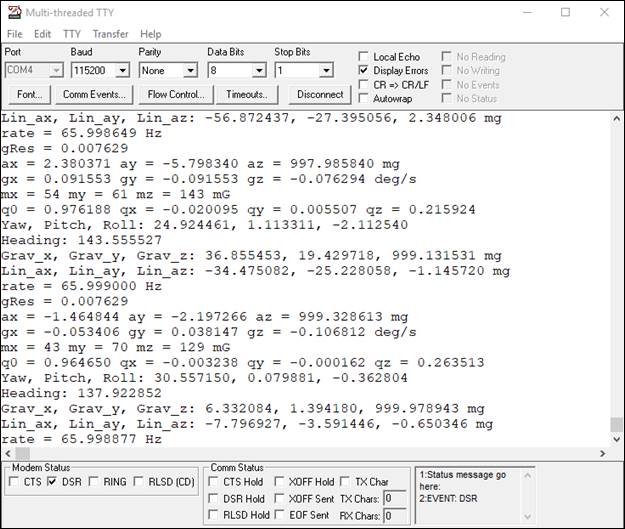
When it’s all up and running, if you are looking at the output through a serial terminal (MTTTY, for example), you should see the following after waving the breadboard in the air for some calibration:
To learn more about how we used the IMU data in a robotics application, look for my articles and videos on “Developing an Autonomous Race car,” coming soon.