

If you’ve ever had the… pleasure… of debugging a application using an SSL/TLS connection with Wireshark (or any other packet analyzer for that matter), you’re probably deeply aware of the challenges involved. If you don’t happen to fall into this unfortunate category of souls, we can still paint you a pretty good picture.

Update: As of NNDK version 3.5.0 (February 2024) there’s an easy way of doing this. See the “Updated: Easy Alternative” section below for details.
Imagine, for a moment, that you’re sitting there, doing your developer thing. You’ve got two machines, your PC, and a brand new shiny MODM7AE70 development kit. Your project requires sending sensitive data from the device to your PC. No problem! With NetBurner’s SSL/TLS libraries, you have the first iteration of your application up and running in no time. You set up a quick test scenario, and…. something isn’t quite right. You see the data that you’re sending out before it hits the network. However, what you’re getting on the other side isn’t correct. Maybe it’s mangled, or is missing information, or ever other character has mysteriously turned into a ‘~’. “No worries,” you say to yourself, “I’ll just open Wireshark and see what’s going on here.” A few short minutes later you run the test again, and see the following.
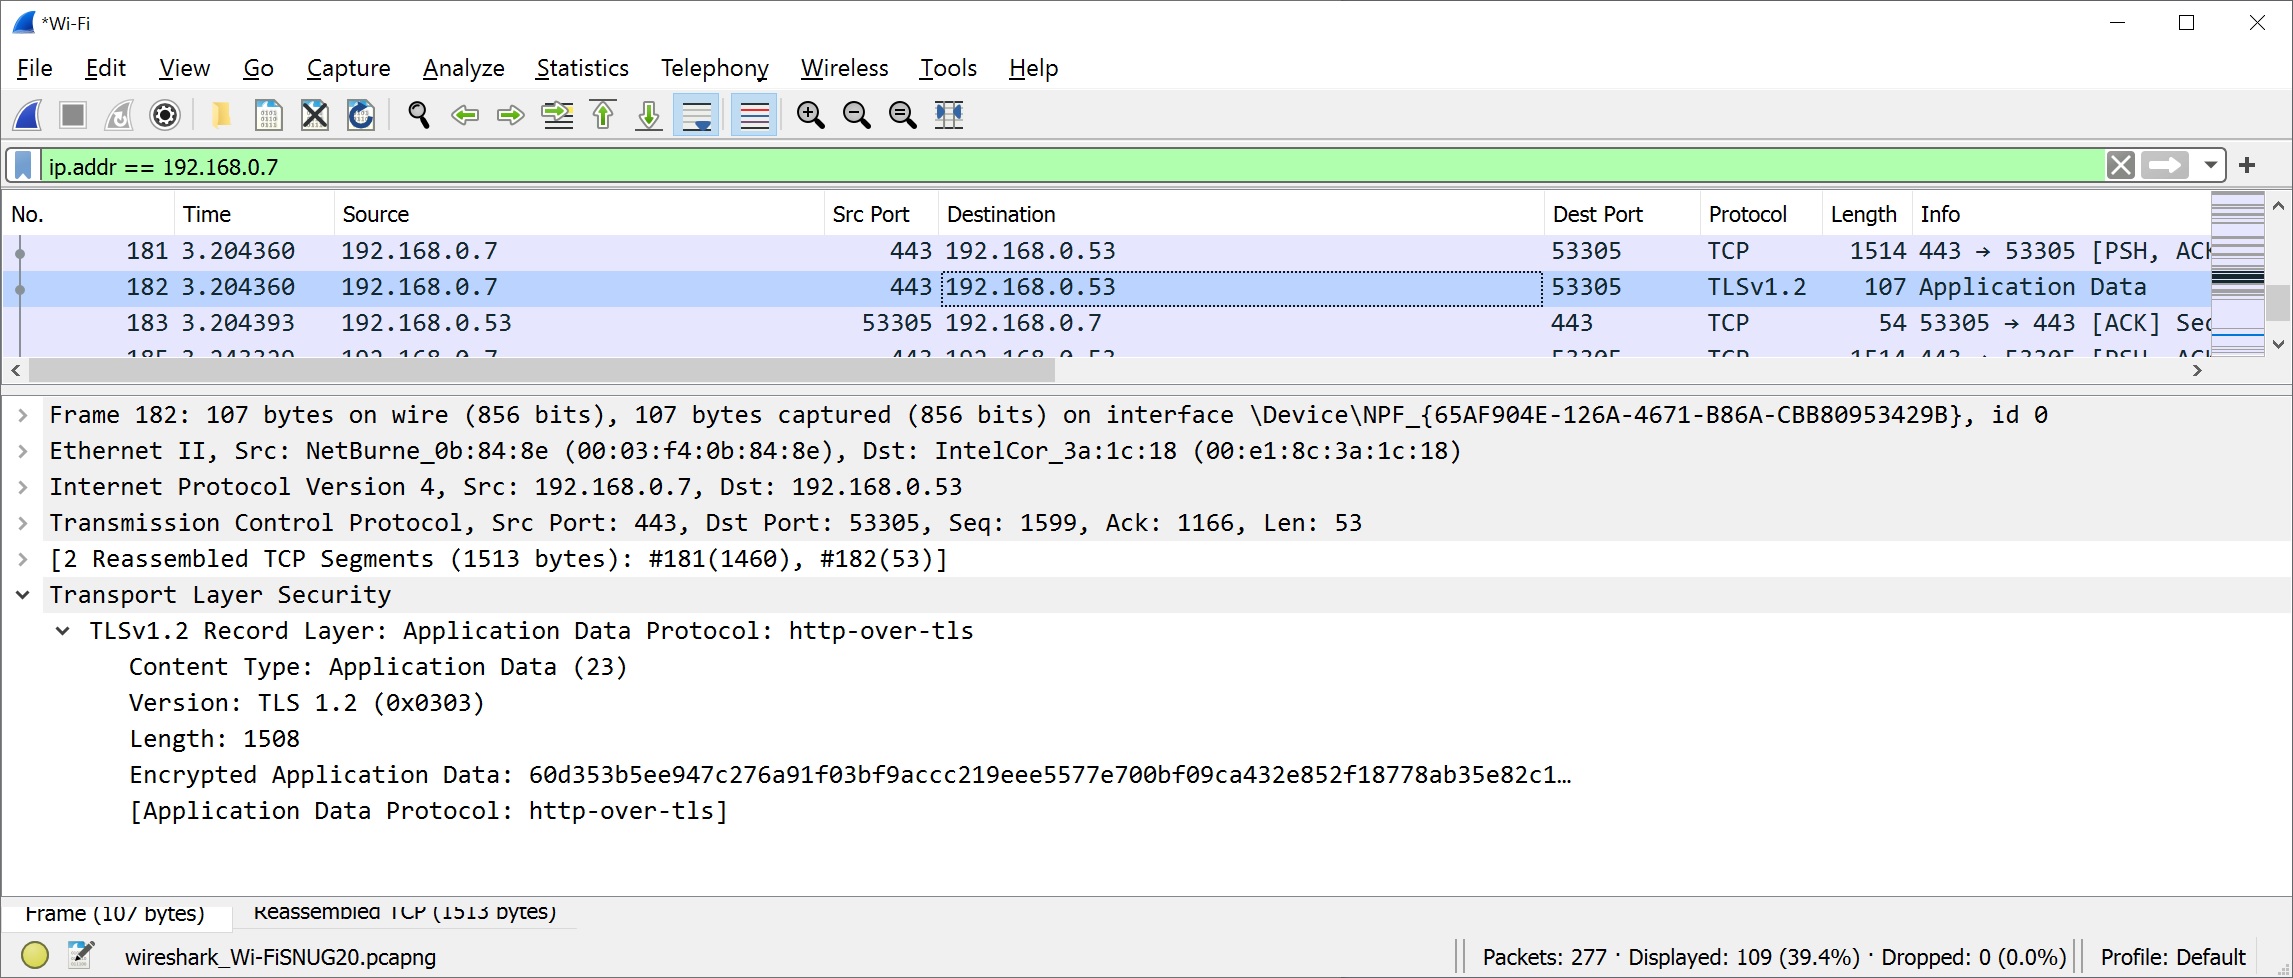
Most of this looks great, until you actually look at the data, and are greeted with, “Encrypted Application Data: <insert jumbled mess of characters here>”. Trying to debug issues over an encrypted connection with Wireshark is a lot like trying to edit an article in a language you don’t know. Maybe you know what it’s supposed to say. Unfortunately, that doesn’t help you as you’re staring at the mix of unfamiliar garbage sitting in front of your face.
Fortunately, there is hope. Given the proper information, Wireshark can decode this information for you and let you see exactly what’s being sent over the wire. In this article, we’ll cover the steps you have to go through to get to this goldmine of debugging goodness. First, we discuss what information needs to be set in Wireshark and demonstrate how to do it. Then we’ll look at how to get that information from the NetBurner device. Finally, we’ll show what it looks like in action.
Adding Secrets to Wireshark
We won’t dive too far into the TLS handshake in this article, but having a basic understanding of how it works will help explain what we need to do in Wireshark. In every secure SSL/TLS connection, information sent back and forth between the client and server is encrypted using a secret key (also called a premaster secret) that is generated by the client during the TLS handshake. Without this secret key, neither side can decrypt any messages that are encrypted by the other side.
If you’ve ever seen a Christmas Story, the secret key is akin to the decoder pin Ralphie was so excited about, only to realize he had been duped into decoding a marketing message by Ovaltine. Hopefully your own encrypted data is a little more interesting…

The generation of this secret key and how it is securely sent from the client to the server is a bit out of the scope of this article, but we recommend the guide found here for those looking for a deeper explanation. The important part that we need to be aware of is that without this secret, our chances of being able to decrypt any messages captured between the client and server are pretty slim.
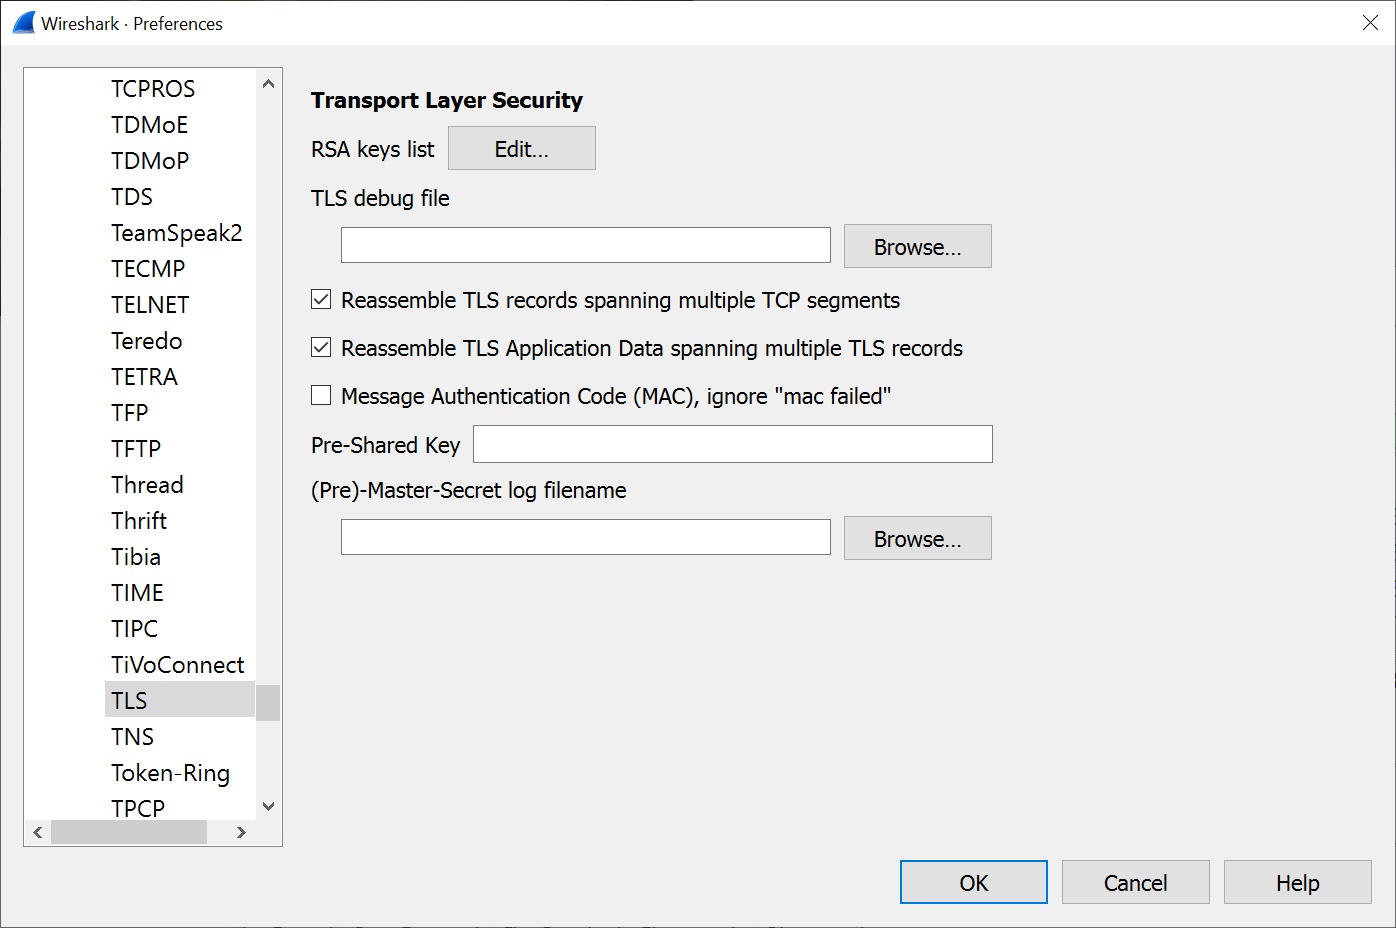
Fortunately, adding this information to Wireshark is pretty straightforward. To add the secrets, first go to Edit->Preferences->Protocols->TLS from the Wireshark menu. From this window, at the bottom, you’ll see the field labeled, “(Pre)-Master-Secret”. From there, you’ll hit a button labeled, “Browse”, and then select the file containing your secret keys (more on this below for NetBurner applications).
Now that we know where to load the secret key, the question is where to get it. Fortunately, for NetBurner devices a few small code changes will give you everything you need to start looking at that network traffic. Please keep in mind that this should be used only for debugging purposes in non-production environments. When it comes to secret keys used out in the real world, Gandalf said it best…
Changes to NetBurner Application Code
Updated: Easy Alternative
As of NNDK version 3.5.0 (February 2024), you can ignore the System Library Changes section below and simply edit<nndk_install>\libraries\include\crypto\platform\<platform>\user_settings.h at about line 356. Uncomment the SHOW_SECRETS and HAVE_SECRET_CALLBACK lines so they’re defined and you’re good to go, no actual code required!
System Library Changes
Now let’s look at getting that secret. As we mentioned before, in order to get the secret that is required to decrypt our packets, we’ll need to make a few changes to the crypto libraries. Don’t worry, though. These are short, painless, and easy to put in and take out. First, open the file <nndk_install>\libraries\crypto\src\tls.c .
At the top of the file, add the following snippet of code:
#include <stdio.h>
void SaveMasterSecret( const char* pmsBuf, int pmsPos )
{
    iprintf("%s\r\n", pmsBuf);
}
#define  SHOW_SECRETS (1)
This bit of code sets a define that will make the secret accessible, and the function SaveMasterSecret() will simply output everything passed to it out the serial port. Next, down in the function MakeTlsMasterSecret(), replace
/* print master secret */
puts(pmsBuf);
with
/* print master secret */
//puts(pmsBuf);
SaveMasterSecret(pmsBuf,pmsPos);
Now, choose any SSL/TLS example, or if you’re already working on your application, rebuild the system libraries and the project. If you’re using our latest tools, either with NBEclipse or via the command line, everything is taken care of when you rebuild the project itself, as all of the system libraries are included as a part of this process. If you’re using our NNDK 2.x tools, you’ll need to rebuild the system libraries separately before building the application.
Example Code Changes
For the purpose of this article, we’ll be using our 3.x tools and will do our testing with the SSL client example. It very simple, and shows how the NetBurner device can connect to an SSL server. You can find this example in <nndk_install>\examples\SSL\sslclient.
For this example, you’ll need to do two things in addition to the system changes above. The first is to add the IP address of your SSL server to the example. Simply change the macro SSL_SERVER_NAME to the proper IP address, and rebuild the application. The second is to actually start the SSL server that will receive the connection. For this we use this OpenSSL command from the command line:
openssl s_server -key Server.key -cert Server.crt -accept 4433 -no_ticket -no_cache
Note that you’ll need to have a certificate (-cert) and key (-key) handy. We generated ours using the certificate generation scripts provided with the NNDK tools. For more info on that, see our article on self signed certificates. The flag -accept just dictates what port the SSL server will accept connections on. The flags -no_ticket and -no_cache will prevent connections from using session resumption, which will make our lives a tad easier when trying to decrypt the packets from Wireshark.
After we’ve started the server, go ahead and start listening for the packets on Wireshark. If you’re using MTTTY for your serial terminal, we recommend that you log the serial data directly to the file. This will prevent you from having to do a lot of reformatting to the keys like you would if you were to simply copy and paste. To log the data directly, go to Transfer->Log to File (text) from the top menu and select where you’d like to save the data. Finally, load the application to the module. You should see something like the following (we modified the example slightly to display only the secret keys).
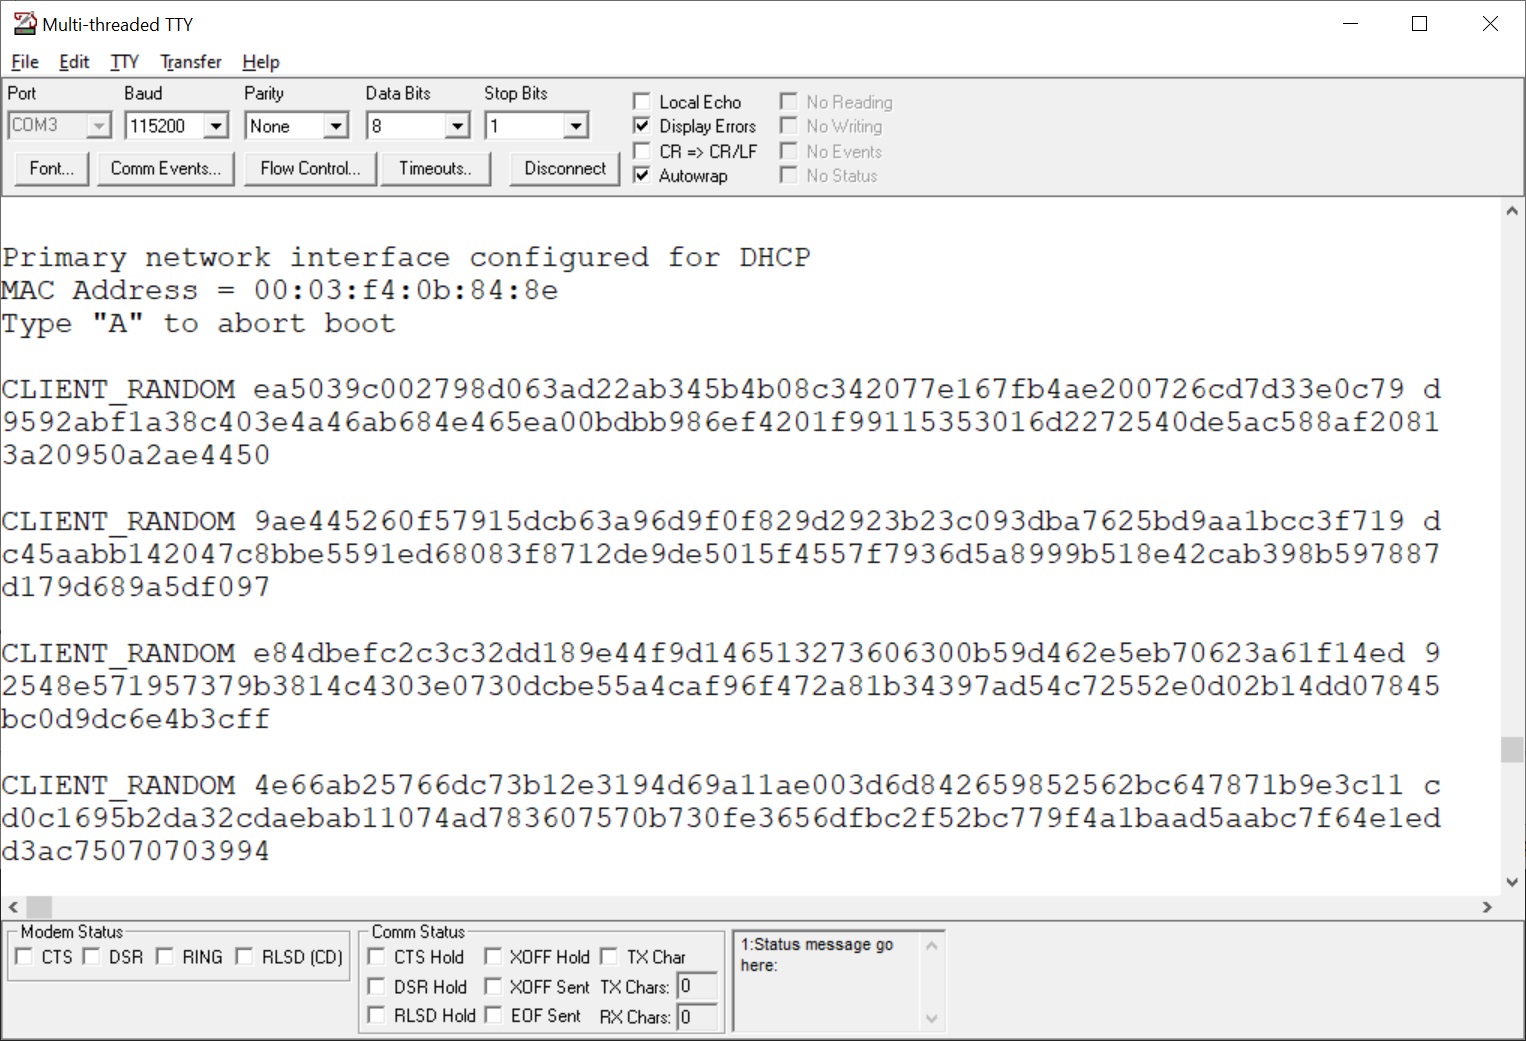
When the example has completed its run, stop the logging and open the file everything was logged to in your text editor. We only want the lines starting with “CLIENT_RANDOM” in our file, so delete anything else.
Putting it All Together
If you haven’t already, go ahead and stop the packet transfer capture in Wireshark. Now we have our packet data, secret keys, and we know how to install them into Wireshark. Let’s go back and see if we can’t figure out what’s actually getting sent over the wire.
Load the key file via the menu mentioned above (Edit->Preferences->Protocols->TLS), and voila! You can see in the image below that below the packet information is a tab that says, “Decrypted TLS (34) bytes)”. When we click on that, it shows the data in the packet decrypted, just like we were hoping.

What’s Next
Now that can see what’s actually being sent between your devices in an encrypted connection, will all of your SSL/TLS and application debugging issues magically go away? Absolutely not! Working with encrypted connections can be challenging, even when you’re able to see all of the pieces. That said, knowing what you’re looking at will certainly make a huge difference.
If you have any questions or additional tips and tricks that can be used while trying to debug encrypted connections, feel free to let us know in the comments below, or to email us directly at [email protected].