

In addition to the NBEclipse IDE, the NetBurner development kits provide command line tools that can be used to build and load applications directly onto NetBurner modules. While some prefer the simplicity associated with working from the command prompt, the command line tools can also be used to integrate with a different IDE, or to automate the build process for whichever build system you prefer. NetBurner’s command line tools are supported for Windows, macOS and Linux.
In this article, we will start with a quick example of building a NetBurner example, and then move on to the details of creating your own makefiles.

Building a NetBurner Application from the Command Line
Command line builds use the make utility, and all NetBurner examples have an associated makefile. The following demonstrates how to do a command line build of the example \nburn\examples\ShowInterfaces for a MODM7AE70 on Windows 10. The first step is to open a command prompt and navigate to the example directory. Once there, the key commands are:
| Command | Description |
|---|---|
make -j | The “-j” option builds the application using all available processor cores, which will greatly speed up the build. Note: if you have errors, they may be easier to view by using just “make” so the display is from a single thread. |
make -j load | Builds the application and downloads the application image to a NetBurner device. If the DEVIP environment variable is defined it will be used, otherwise it needs to be added to command. For example, “make -j load DEVIP=192.168.1.1”. To set the variable in Windows: “SET DEVIP=192.168.1.140”. |
make clean | Deletes all object and image files. |
make -j debug | Build in debug mode. |
There are also various environment variables that can be used:
| Variable | Description |
|---|---|
| PLATFORM | Specifies the NetBurner platform for the build. Typically used when you have multiple NetBurner platforms, such as MODM7AE70, MOD5441X, NANO54415, and SB800EX. |
| DEVIP | Specifies the target IP address of your NetBurner device. If defined, you can run make -j load. |
In Windows, you can set the environment variables from the control panel or you can specify them from the command prompt with the SET command. For example, typing SET DEVIP=192.168.1.140 will set the DEVIP variable to 192.168.0.140. Calling just SET DEVIP will show you what value is currently assigned. For macOS and Linux, use the EXPORT command.
It’s important to note that if you set environment variables directly from the command line in Windows, they will only be set for that particular instance of the command terminal. If you were to open a second command prompt and look at the variables value, you will see that they are still set to their default values. Additionally, if you change them from the control panel, those changes will note be reflected in any currently open command prompts. You will need to reopen them for those changes to take affect.
To build the example, type make -j from the example directory:

The first time you build a project it will build the system libraries, and you will see the files rapidly scrolling by. From that point forward only files that have changed will be built. When the build is complete you will see a build summary showing the build options and memory usage:

The following shows an example when the load command is used. The load command invokes the nbupdate utility. If you are experiencing any difficulty in the application download, you can run the nbupdate utility from the command line to troubleshoot any issues.
Creating a Makefile for your Project
The screen shot below shows the file structure of the ShowInterfaces example we built in the \nburn\examples folder. The ShowInterfaces project folder contains:
- The project makefile
- The html folder for HTML source code
- The src folder for the application source code
- The obj folder for compiled object files
- The release folder for the compiled application image (ShowInterfaces.bin) and compiled library files

In an effort to simplify makefiles, the makefile for a project focuses on identifying the source files, and then invokes another makefile, \nburn\make\boilderplate.mk, that handles the low level details common to all NetBurner projects. Here is the makefile for the ShowInterfaces example we built earlier:
NAME    = ShowInterfaces

CPP_SRC     += \
            src/main.cpp \
            src/ip_util.cpp

CREATEDTARGS += src/htmldata.cpp
CPP_SRC += src/htmldata.cpp
src/htmldata.cpp : $(wildcard html/*.*)
	comphtml html -osrc/htmldata.cpp

include $(NNDK_ROOT)/make/boilerplate.mk
Examining the Makefile
So what does all of this actually do? Let’s take a look.
The NAME field specifies the name of the .bin file that will be generated.
The CPP_SRC specifies the project’s C++ source code files. The ‘\’ continuation character is there to make it easier to read and list the source files one per line. Note that the path is relative to the project root folder, so files have a “/src” prefix. To add C files, add a C_SRC field, to add assembly language files add a AS_SRC field.
The CREATEDTARGS, CPP_SRC, and comphtml utility process the auto-generated htmldata.cpp. This file contains everything in the project’s html folder. If your application does not have a web interface, none of these lines are necessary and you can comment them out with the ‘#’ character (just in case you decide to add one later).
Finally, the boilerplate.mk file is called to complete the system processing.
To create a makefile for your project you can start with this example and change the NAME and CPP_SRC C++ file names accordingly. That is it!
Advanced Compiler Flags
There are a few makefile fields worth noting for advanced control of the GCC compiler. It is beyond the scope of this article to go into all the available compiler flags, but we will use optimization as an example. To turn off optimization for your project you would add: EXTRACPPFLAGS := -O0. Note that is a capital letter ‘O’ followed by the number zero.
| Field | Description |
|---|---|
| EXTRACPPFLAGS | Affects all C and C++ files |
| EXTRACFLAGS | Affect all C files |
| EXTRACXXFLAGS | Affects all C++ files |
| EXTRAASFLAGS | Affects all assembly files |
| EXTRALINKFLAGS | Affects the linker |
The Overload Feature
As of NNDK 3.x, all of our system libraries are now build individually for each project. This is a fantastic feature if you need to modify some of the predefined values or source code on a per project basis. To do this, simply create an overload directory in your root project directory. When you know the files that need to be overloaded, copy them into the overload directory, being careful to ensure that the file path from the overload directory has the same path as the original system file.
For example, if you wanted to overload nbrtos/include/predef.h then you would copy that files to project/overload/nbrtos/include/predef.h. For more information on how this works, please see our documentation.
Additional Command Line Tools
In addition to those mentioned above, there are some very useful command line tools that can be run directly from the command line. We’ve listed a few here, as well as a short description on what each does.
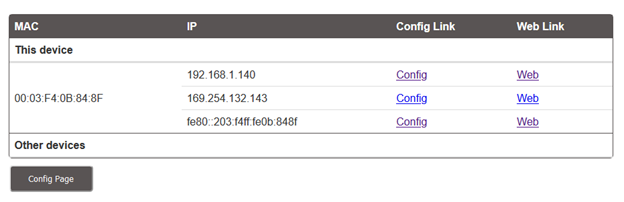
localdiscover
To locate your NetBurner device, localdiscover will send out a request to all of the NetBurner devices on your network and display the results in a web browser. The image below shows the device’s mac address as well as the IPv4, IPv6 and AutoIP addresses. From here, you can access the device’s configuration page, or the web page being served by the application running on the device itself.
nbupdate
nbupdate is a multi-platform command line utility. The format is: nbupdate <filename> <ip address>. For example, nbupdate ShowInterfaces.bin 192.168.1.140. If the environment variable DEVIP is set, the IP address parameter is not required. As mentioned earlier, this is the same utility invoked by running make -j load.
wget
WGET is an industry standard utility that allows you to download files over TCP/IP protocols FTP, HTTP and HTTPS. If you are using macOS or Linux, WGET is usually already installed (or can using your package manager). Windows users will need to install it, please refer to this page.
The WGET utility can be used for several things:
- Updating the device application image
- Retrieving device configuration information in JSON
- Updating device configuration information in JSON
In the examples below we use a device IP address of 10.1.1.60 and an application name of myApplication.bin.
Program an Application
To program a new application into the device:
wget --post-file=myApplication.bin 10.1.1.60:20034/appupdate.html
All updates are processed by the Configuration Server running on the NetBurner device. The –post-file specifies that a POST operation is to be performed. The IP address and configuration port number are next, along with the server post destination that will always be appupdate.html.
If using authentication with a username of “user”, and password of “pass”:
wget --auth-no-challenge --user=user --password=pass --post-file=myApplication.bin 10.1.1.60:20034/appupdate.html
Read The Configuration
Read the current configuration into a file named config.txt:
wget 10.1.1.60:20034/Config
In this case the destination is Config, rather than appupdate.html. If you would like to specify a directory to store the file, use the -P option:
wget 10.1.1.60:20034/Config -P \myDir
Program New Configuration Settings
The easiest way to do this is to first read the configuration and save to a file so you have a template to work with, then edit the settings you need. Then post the configuration file to each new device:
wget --post-file=newconfig 10.1.1.60:20034/Config
Wrapping Up
It’s clear that there are a multitude of ways to build and deploy applications to your devices. We want to make sure that every developer has a path that allows them to work as efficiently and effectively as possible, whether that’s using NBEclipse, MS Visual Studio, or Vim. If you have any questions or comments on our utilities, we’d love to hear from you! Please drop a note in our comments below, or send us an email directly at [email protected].
1 thought on “Building Applications with NetBurner Command Line Tools”
I must admit that I don’t really like the Eclipse IDE, it feels a bit old, although its debugging tools are pretty good.
Lately, I’ve been using VS Code for all kinds of back-end, front-end, and firmware development and have settled quite a bit, especially for autocompletion.
I made a little base for using the netburner command line, it’s very basic and I don’t even know how to debug from VS Code … so I’ll use it as a text editor and continue to use Eclipse for more complex tasks.
To achieve it I base myself on this tutorial: https://mcuoneclipse.com/2021/05/01/visual-studio-code-for-c-c-with-arm-cortex-m-part-1/
Because I am not an expert in Cmake I did not use it as it comes in the tutorial, although it would be good if you had a tutorial on how to use it to be able to achieve this other tutorial https://medium.com/practical-coding/c- documentation-with-doxygen-cmake-sphinx-breathe-for-those-of-use-who-are-totally-lost-7d555386fe13
For my base using VS Code I made the following files inside the .vscode folder. If you have any other settings to use VSCode, I would greatly appreciate it if you could provide it to me.
tasks.json
{
// See https://go.microsoft.com/fwlink/?LinkId=733558
// for the documentation about the tasks.json format
“version”: “2.0.0”,
“tasks”: [
{
“type”: “shell”,
“label”: “Build & Load Project”,
“command”: “make -j load DEVIP=192.168.137.100”,
“options”: {
“cwd”: “${workspaceFolder}”
},
“group”: {
“kind”: “build”,
“isDefault”: true
},
“problemMatcher”: {
“base”: “$gcc”,
“fileLocation”: [
“relative”,
“${workspaceFolder}”
]
}
},
{
“type”: “shell”,
“label”: “Build Project”,
“command”: “make -j”,
“options”: {
“cwd”: “${workspaceFolder}”
},
“group”: “build”,
“problemMatcher”: {
“base”: “$gcc”,
“fileLocation”: [
“relative”,
“${workspaceFolder}”
]
}
},
{
“type”: “shell”,
“label”: “Clean Project”,
“command”: “make clean”,
“options”: {
“cwd”: “${workspaceFolder}”
},
“group”: “build”,
“problemMatcher”: {
“base”: “$gcc”,
“fileLocation”: [
“relative”,
“${workspaceFolder}”
]
}
},
{
“type”: “shell”,
“label”: “Build Debug Project”,
“command”: “make -j debug”,
“options”: {
“cwd”: “${workspaceFolder}”
},
“group”: “build”,
“problemMatcher”: {
“base”: “$gcc”,
“fileLocation”: [
“relative”,
“${workspaceFolder}”
]
}
},
]
}
c_cpp_properties.json
{
“env”: {
“NB_PATH”: “D:/Programas/nburn”
},
“configurations”: [
{
“name”: “Netburner MODM7”,
“cStandard”: “c11”,
“cppStandard”: “c++17”,
“browse”: {
“path”: [
“${workspaceFolder}”,
“${NB_PATH}”
],
“limitSymbolsToIncludedHeaders”: false
},
“includePath”: [
“${workspaceFolder}”,
“${workspaceFolder}/src”,
“${workspaceFolder}/**”,
“${NB_PATH}/gcc/arm-unknown-eabi/sys-include/”,
“${NB_PATH}/arch/cortex-m7/cpu/SAME70/include”,
“${NB_PATH}/arch/cortex-m7/include”,
“${NB_PATH}/gcc/arm-unknown-eabi/include”,
“${NB_PATH}/gcc/arm-unknown-eabi/include/c++/8.1.0”,
“${NB_PATH}/gcc/arm-unknown-eabi/include/c++/8.1.0/arm-unknown-eabi”,
“${NB_PATH}/gcc/arm-unknown-eabi/include/c++/8.1.0/backward”,
“${NB_PATH}/gcc/arm-unknown-eabi/sys-include/**”,
“${NB_PATH}/gcc/lib/gcc/arm-unknown-eabi/8.1.0/include”,
“${NB_PATH}/gcc/lib/gcc/arm-unknown-eabi/8.1.0/include-fixed”,
“${NB_PATH}/libraries/include”,
“${NB_PATH}/nbrtos/include”,
“${NB_PATH}/platform/MODM7AE70/include”
]
}
],
“version”: 4
}