

In one of our recent articles, we review how it’s possible to decrypt traffic encrypted with Wireshark for the purpose of debugging. That’s all well and good when you have everything already set up, but what about just testing your server or your client? If you’re responsible for developing both ends of the connection, having an easy way to test one side or the other against a known working component is invaluable. Fortunately, there is a tool out there that makes this relatively easy to do. Even better, it comes ready to go with the NNDK, so there’s no need to go rooting around searching and installing various pieces of software.

In this article, we’re going to walk through that tool, OpenSSL, and see how you can use it to test your custom client and your server applications. We’ll also cover some valuable flags you might need when testing particular ciphers, session resumption, or other specific settings.
Setting Up and Getting Started
Before we can jump into our testing glory, we need to make sure we have a few things ready to go. Mainly, you’ll need to make sure you have OpenSSL available on your machine. If you’ve installed the NNDK from one of our development kits, it should be located in the pcbin folder of your install directory. If you don’t have our tools installed, you can find everything from the OpenSSL website.
Make sure to pay attention to which version you grab, as that will determine which ciphers you can use during your testing. The version we currently ship our tools with is OpenSSL 1.1.0l. This version supports several of the latest ciphers and is perfect for our functional testing.

To determine what version of OpenSSL you currently have installed on your computer, open a command prompt and type the command, openssl version. If you want to see your current list of available ciphers, you can use the command, openssl ciphers. This command will display a very condensed list of what ciphers are currently available. The resulting output should look something like the following image.
NetBurner Examples Used
In this article, we’re going to use two examples to help demonstrate testing with OpenSSL. The first will be our SSL\TLS server. The second will be our SSL\TLS client. You can find the example code for both of these in <nndk_install>/examples/ssl/. The server is in the folder sslserver, while the client is in the folder sslclient. Like most of our examples, we have tried to make both of these a great launching point for more complex and complete applications.
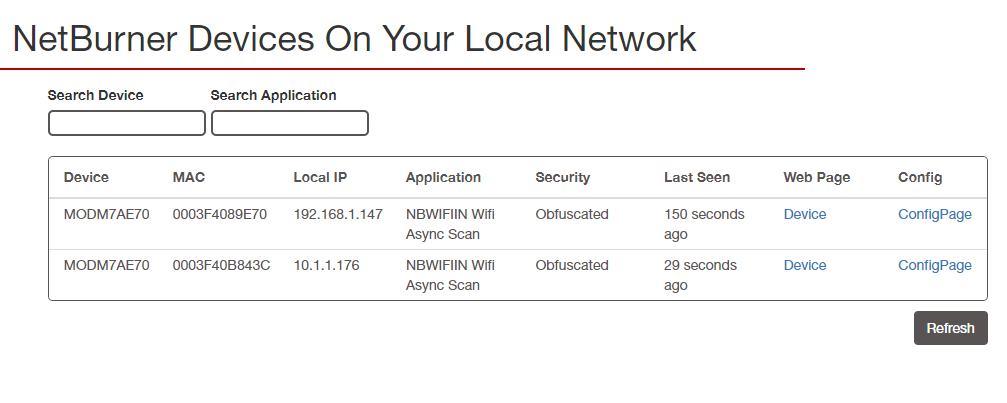
To load these applications on your device, you’ll first need to know its IP address. If your device is connected to your local network and you have internet access, this is as easy as opening your browser and going to discover.netburner.com.
Once you know this, building and updating your device with either of these examples is pretty straightforward. We walk through this in our documentation, which details how to get a project up and running using our custom IDE, NBEclipse. If you prefer to work from the command line, we recently wrote an article detailing the steps needed to go that route.
Testing A Secure Server Application with OpenSSL
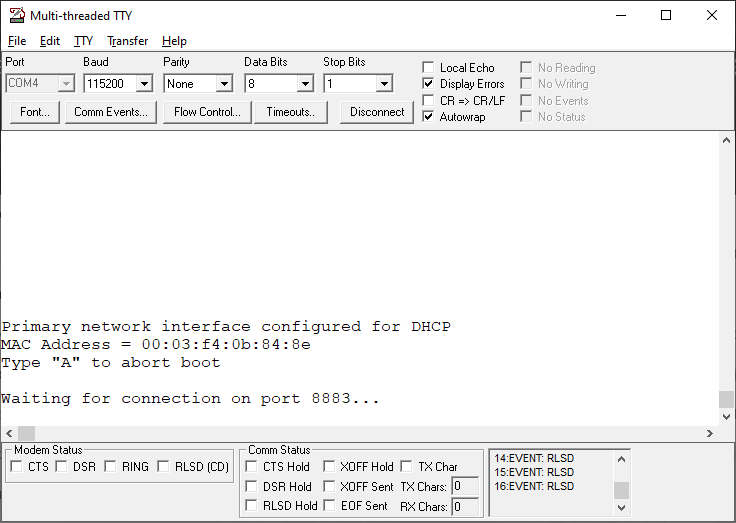
Let’s go ahead and load the SSL\TLS server example application on our module, a NetBurner MODM7AE70. This module will represent the custom secure server that we need to test using the OpenSSL client. Open a MTTTY terminal (or your preferred serial terminal), connect it to the proper com port, then power your device. You should see the following serial data when the application has booted and is ready for a connection.
Time to test our server. From a command terminal, we’re going to enter the command:
openssl client -connect <device IP address>:<port>
Where <device IP address> is the address of your device, and the port is the port the device is listening to for the connection request. By default, this is port 8883. If all goes well, the devices connect, and you’ll see the following in the serial terminal.

From your command line window, you’ll see a bunch of text scroll by, as shown in the image below, followed by a fairly long list of numbers. The list of numbers is just test data that the module sends to verify the connection’s functionality. The information above that, however, is pretty interesting and gives some specific information about the connection itself. In fact, let’s take a minute to review what we’re actually seeing here. The first section shows a little bit of information about the server certificate that was sent:
depth=0 C = US, ST = CA, L = San Diego, O = "NetBurner, Server", CN = 10.1.1.128
verify error:num=20:unable to get local issuer certificate
verify return:1
depth=0 C = US, ST = CA, L = San Diego, O = "NetBurner, Server", CN = 10.1.1.128
verify error:num=21:unable to verify the first certificate
verify return:1
The verify error listed here is because we’re using a self-signed certificate and didn’t provide the certificate authority’s certificate needed to validate the server’s certificate (a critical step in any production environment). If you wanted to do this, you would add the certificate authority file with the -CAfile flag.
While we provide the self-signed certificates to use in the examples, we don’t provide the corresponding Certificate Authority certificate used to generate them. Therefore, to use this flag with our above example, you would need to recreate your own self-signed certs. Fortunately, we have some scripts that make this incredibly easy to do, as well as an article detailing the steps explaining how to do it.
The second section of the client connection output shows the certificate chain. Because we created self-signed certificates for use in this example, this list is very short. We have the certificate authority we created to sign the server’s certificate and the server certificate itself.
Certificate chain
 0 s:/C=US/ST=CA/L=San Diego/O=NetBurner, Server/CN=10.1.1.128
   i:/C=US/ST=CA/L=San Diego/O=NetBurner, Cert Auth/CN=NetBurner, Cert Auth
Underneath this section, we have the server certificate itself. It’s fairly unintelligible on its own, so we’ve left that chunk out. Below the server certificate are a few sections that give most of the details on the actual connection. This is where you’ll find most of the information you can use to troubleshoot and test different aspects of your application, such as the protocol, the cipher suite used, the session ID or ticket, etc.
No client certificate CA names sent
Peer signing digest: SHA256
Server Temp Key: X25519, 253 bits
---
SSL handshake has read 841 bytes and written 386 bytes
Verification error: unable to verify the first certificate
---
New, TLSv1.2, Cipher is ECDHE-ECDSA-AES256-GCM-SHA384
Server public key is 256 bit
Secure Renegotiation IS NOT supported
Compression: NONE
Expansion: NONE
No ALPN negotiated
SSL-Session:
    Protocol : TLSv1.2
    Cipher : ECDHE-ECDSA-AES256-GCM-SHA384
    Session-ID: 334628C1F16F5372C444AB961C20668EB6BFB01CB18CEAF38B758761ADB82356
    Session-ID-ctx:
    Master-Key: ADE5E1790DE0FCF5824DF9FA6D32846E4178E4DCADFD16A7629E3A8071D15A166915548456910940435C1608894DC49A
    PSK identity: None
    PSK identity hint: None
    SRP username: None
    TLS session ticket lifetime hint: 300 (seconds)
    TLS session ticket:
    0000 - 4e 42 53 65 73 73 69 6f-6e 54 69 63 6b 65 74 00 NBSessionTicket.
    0010 - c1 2f 72 09 e4 e7 94 01-96 30 15 b2 53 80 bc ec ./r......0..S...
    0020 - 00 3c d7 9b 99 25 a0 66-39 58 2e bd 22 b2 88 b8 .<...%.f9X.."...
    0030 - 6d d1 6d 55 7a f0 34 21-ae b1 3d a9 d9 49 44 ab m.mUz.4!..=..ID.
    0040 - 88 bb 75 0d 6f c8 6c db-8c d9 09 7f ef 97 7f 24 ..u.o.l........$
    0050 - ac 28 7b fb 5a d8 a3 e8-5f a6 ec 31 b9 bf d4 ea .({.Z..._..1....
    0060 - 96 f3 7e aa a3 76 24 79-6a 92 e9 8f be 7e 00 00 ..~..v$yj....~..
    0070 - 00 00 00 00 00 00 00 00-00 00 00 00 00 00 ..............

    Start Time: 1625001123
    Timeout : 7200 (sec)
    Verify return code: 21 (unable to verify the first certificate)
    Extended master secret: no
---
In our example, we can see that we connected using TLS v1.2, with the cipher ECDHE-ECDSA-AES256-GCM-SHA384. We can also see that the server application sent us a session ID and ticket.
Testing a Secure Client Connection with OpenSSL
Now that we’ve covered how to use OpenSSL to test a secure server application let’s flip things around and look at how you might use OpenSSL to test a client. To do this, first, you’ll need to create a self-signed certificate and key that your server can use. As we mentioned above, the NetBurner NNDK provides a set of scripts that make this very easy. The scripts are located in the <NNDK Install>\CreateCerts\ECDSA directory. In addition, you can find the article that walks through how to use them here.
The resulting files that you will need are Server.key and Server.crt. To get your server up and running, type the following command from your command line:
openssl s_server -key Server.key -cert Server.crt -accept 4433
You should see an ACCEPT message in the command window, as shown below. This indicates to us that the server is waiting for a connection request. Let’s not keep it waiting!
Before you can load your client example onto the board, you’ll need to make one small code change. Open up main.cpp, find the #DEFINE that sets the server’s IP address, SSL_SERVER_NAME, and set it to your computer’s IP address. Now you can build the application and load it onto your device as detailed by our documentation.
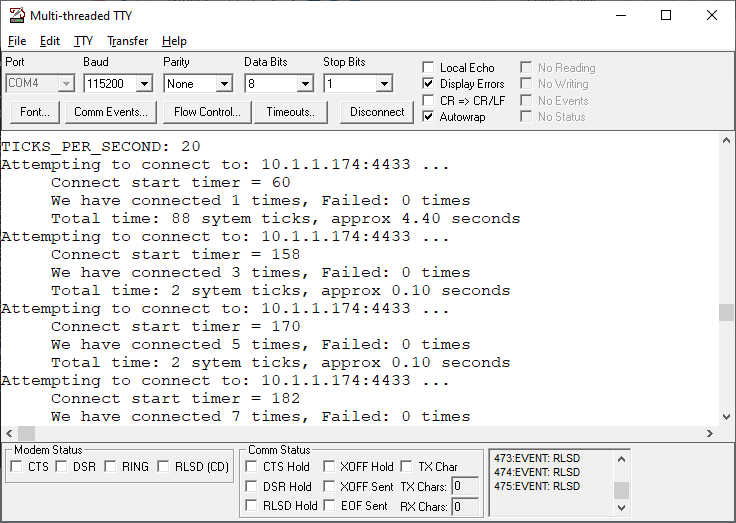
When your client first boots it will attempt a connection to the IP address you specified above. If successful, you’ll see some timing information and a connection counter from our serial terminal. The example is set up to repeatedly connect to the server in order to test session resumption. It should look something like the image below.
From the command prompt, if the connection is successful, you will see a lot of information displayed, beginning with the session parameters. Underneath that are the list of shared ciphers between the server and the client, as well as the supported and shared elliptic curves. Near the bottom, it will indicate which cipher was chosen for the connection. In our example, it is ECDHE-ECDSA-AES128-SHA.
-----BEGIN SSL SESSION PARAMETERS-----
MHUCAQECAgMDBALACQQgTbjfydxoIH/A1oFDyvvCqcP8mRn8spLuWB703PIBHdIE
MNzexoTi38ZWE/hGTiGpZnNKlLMruW4cNkfkVQSFa5SFuW5F+WhuAP4wXGWP5eZW
/6EGAgRg27JwogQCAhwgpAYEBAEAAAA=
-----END SSL SESSION PARAMETERS-----
Shared ciphers:AES128-SHA:DHE-RSA-AES128-SHA:AES256-SHA256:DHE-RSA-AES256-SHA:AES128-SHA256:AES256-SHA256:DHE-RSA-AES256-SHA256:ECDHE-ECDSA-AES128-SHA:ECDHE-ECDSA-AES256-SHA:ECDHE-RSA-AES128-SHA:ECDHE-ECDSA-AES128-SHA256:ECDHE-ECDSA-AES256-SHA384:ECDHE-RSA-AES128-SHA256:ECDHE-RSA-AES256-SHA384:ECDHE-RSA-CHACHA20-POLY1305:ECDHE-ECDSA-CHACHA20-POLY1305:DHE-RSA-CHACHA20-POLY1305:AES128-GCM-SHA256:AES256-GCM-SHA384:DHE-RSA-AES128-GCM-SHA256:DHE-RSA-AES256-GCM-SHA384:ECDHE-ECDSA-AES128-GCM-SHA256:ECDHE-ECDSA-AES256-GCM-SHA384
Signature Algorithms: ECDSA+SHA512:ECDSA+SHA384:ECDSA+SHA256:0x07+0x08:0x06+SHA512:0x05+SHA384:0x04+SHA256:RSA+SHA512:RSA+SHA384:RSA+SHA256
Supported Elliptic Curve Point Formats: uncompressed
Supported Elliptic Curves: P-521:P-384:P-256:X25519:P-224:P-192
Shared Elliptic curves: P-521:P-384:P-256:X25519
CIPHER is ECDHE-ECDSA-AES128-SHA
Secure Renegotiation IS NOT supported
We connected 1 times, Failed 0 times
DONE
shutting down SSL
CONNECTION CLOSED
If you look at the subsequent connections, you’ll notice that they happen much more rapidly, and with a lot less information. This is because we are using session IDs to speed up the handshake
Other Useful Flags
In addition to the base command and -CAfile flag we discussed above, the OpenSSL client has several useful options you can use to set specific behaviors for your tests, such as restricting the use of session IDs and tickets. Below are some of our favorites, but you can find the complete list for clients here, and for servers here.
| Flag | Description |
|---|---|
| -CAfile | This dictates which certificate authority should be used to validate server certificates. This flag is extremely useful when you are using self-signed certificates, but you still want to make sure you can verify the connection. |
| -verify_hostname | Ensure that the hostname you’re connecting to is verified by your Certificate Authority list. |
| -showcerts | Show all of the certificates in the certificate list sent by the server. |
| -cert <certificate name> | Which certificate the client should send if the server is doing peer verification. |
| -cipher <cipherlist> | Which ciphers the client will support. This command modifies the list sent to the server. |
| -no_ticket | Disable support for session tickets. |
Wrapping Up
Hopefully this information has provided some useful insights on ways to use OpenSSL to help test your custom client and server applications. If you have a favorite option or trick that you use with the OpenSSL client or server, we’d love to hear it! Let us know in the comments below. If you have any other questions or issues, please feel free to email us directly at [email protected].