

This is the first article in a two part series that will cover how to use our embedded systems to connect to Microsoft’s Azure IoT Hub service and send messages using the MQTT protocol. We’ll also review how to connect your IoT Hub with other services, so that you can verify your messages are getting sent and received properly. This example was built using our latest system on module, the MODM7AE70, but will also work with the MOD5441X, the NANO54415, and the SB800EX.

In this article, we’ll first walk through what you need to have in order to follow along, and review any assumptions we will make during the course of the article. Then we will briefly review what the test application will actually be using to connect to the Azure IoT Hub service. Next, we’ll walk through each of the other Azure services that will be used in the course of the project, discuss the role of each, and cover how to set them up. With that under our belt, we’ll cover how to compile and load the application on our module. Finally, we’ll talk about how to verify that the messages are getting properly sent and received from the device to the Azure services.
The application that will be running on the MODM7AE70 is very simple. It will initialize a connection to the service, and then when a connection is successful, it will begin to send messages periodically. While we will be using the test application that we’ve developed for this example, we’ll hold off on diving into the code for our next article.
Prerequisites and Assumptions
This project was built using our latest toolset, NNDK 3.x. As mentioned previously, it was tested and run using the MODM7AE70, but should also work for the MOD5441X, the NANO54415, and the SB800EX. While it’s possible to port this application back to earlier versions of our toolset, we haven’t personally done this.
This article will assume that you have downloaded and installed the latest version of our tools, and that you have a module that is up and running, and that is visible on your network. You can verify this by pointing your browser to discover.netburner.com if you are connected to an outside network. For information on getting started with the module right out of the box, please see our Quick Start Guides. This example also requires access to Microsoft Azure services, so a network connection is required to run the example application.
This example application is hosted on GitHub and can be downloaded here. Whether you clone the repo or just download the application as a .zip file, you should end up with a folder containing two subfolders: src and html. These directories contain the source code for the example. The parent directory, AzureExample, will be the root folder for our application, and will be used as a reference point for the rest of the article.
It’s extremely helpful to be able to monitor serial output as the device connects to the Azure Iot Hub and starts sending messages. The development boards are set to use the USB port for both power as well as to send and receive this debug serial data by default. You can also use UART0 to send out this debug information, which is a DB9 serial port on the MOD-DEV-70CR development board. If you don’t have a corresponding serial port on your computer to make that connection (and it’s not that common to have these days) but would like to use the DB9 port, we recommend getting a USB to DB9 serial adapter to get the job done for you.
A Quick Review of the Example Application
To keep things as easy as possible for this example, we made the application extremely simple. It will initiate a connection to the Azure IoT Hub we create, and upon a successful connection, will begin to send MQTT packets every 5 seconds. These packets contain a timestamp as well as an incrementing ID. We don’t dive too much into the code in this article outside of building the project and loading the application onto the MODM7AE70. We’ll save those juicy details for the follow-up article.
Azure Services Overview
There are a few key Azure services that we will need to use in order to get this project off the ground. Keep in mind that any real world application will likely involve many other services as well, since all we’re doing here is receiving the message and sending it to an Event Hub. From here, you’ll likely want to route it to another service so that the data can be properly processed and distributed to your needs.
Azure Subscription
This is how billing is managed for the services and resources that are used. It provides a way to logically group these together for management purposes. We don’t really do too much with this except to create it and assign all of the other instances of our services to it.
Azure Resource Group
This is a container that holds all of the resources used for an Azure solution. All of the instances of the services we use will belong to the same resource group.
Azure IoT Hub
This is the Azure service that our module will actually connect to.
Events Hub
The Event Hub service processes events that are triggered from other services. This service allows the collection and storage of events from many devices, and can make the processed information from those events available to other services.
Event Grid System Topic
Azure’s Event Grid is an event management system that can provide different Azure services and applications access to events. It will let you create event subscriptions that resources can subscribe to. When these specific events take place, they will be forwarded to all of the subscribed resources.
A system topic in the Event Grid represents a specific subset of events that can be defined by you. In our case, this event will be the MQTT packet being received from the device on the Azure IoT Hub service.
Putting the Pieces Together
So now we know which services will be involved. Let’s take a minute to figure out how they are all tied together.
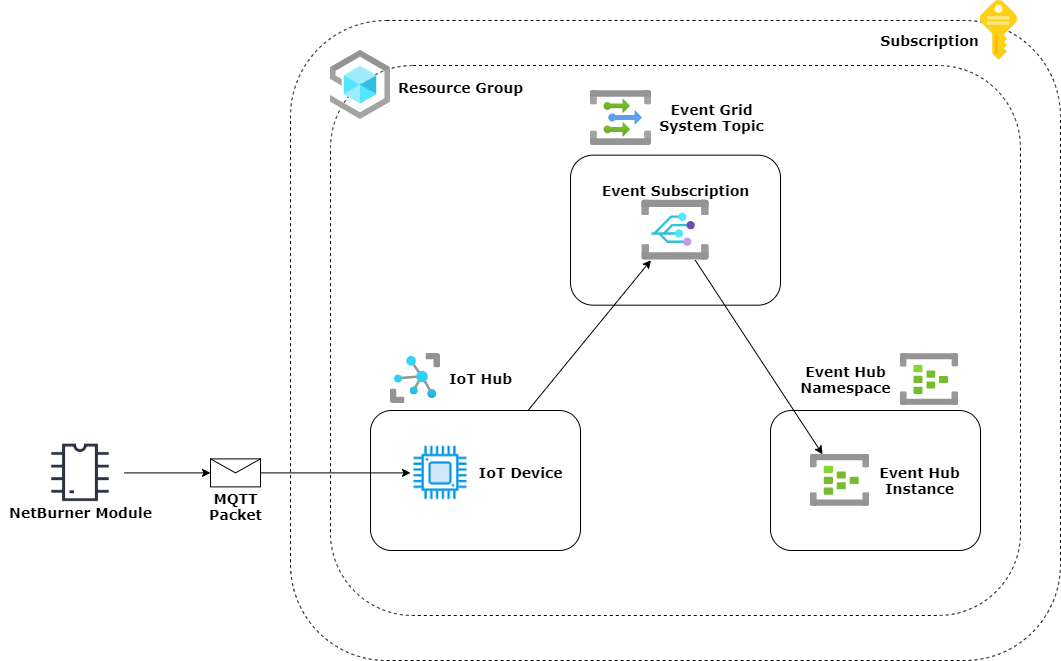
We can see from the image above that the Subscription and the Resource Group just contain all of the other services and don’t participate directly in the application. The NetBurner module will connect to the Azure IoT Hub instance through the SDK, and will be registered as an IoT Device within the IoT Hub. Packets sent from the NetBurner module will be received in the IoT Hub through the connection with the IoT Device. This will register as an event that is then pushed to the Event Grid System Topic.
The Event Grid System Topic will then look at any services or applications that are subscribed to that specific event through an Event Subscription. Those services and applications that are will have the event pushed to them. In our case, we will subscribe an Event Hub Instance to any event from our IoT Hub, which will cause it to receive corresponding events from the Event Subscription.
Setup
Now that we’ve reviewed the purpose of these services and seen how they relate to one another, let’s step through the process of actually setting all of this up. The very first step will be to point your favorite browser over to the Microsoft Azure web portal and sign in. You’ll need a Microsoft account to do this. If for some reason you’ve been able to get through the last three decades without doing this already, well, our hats are off to you. Today, however, will be the day. Fortunately, it’s free to set up.
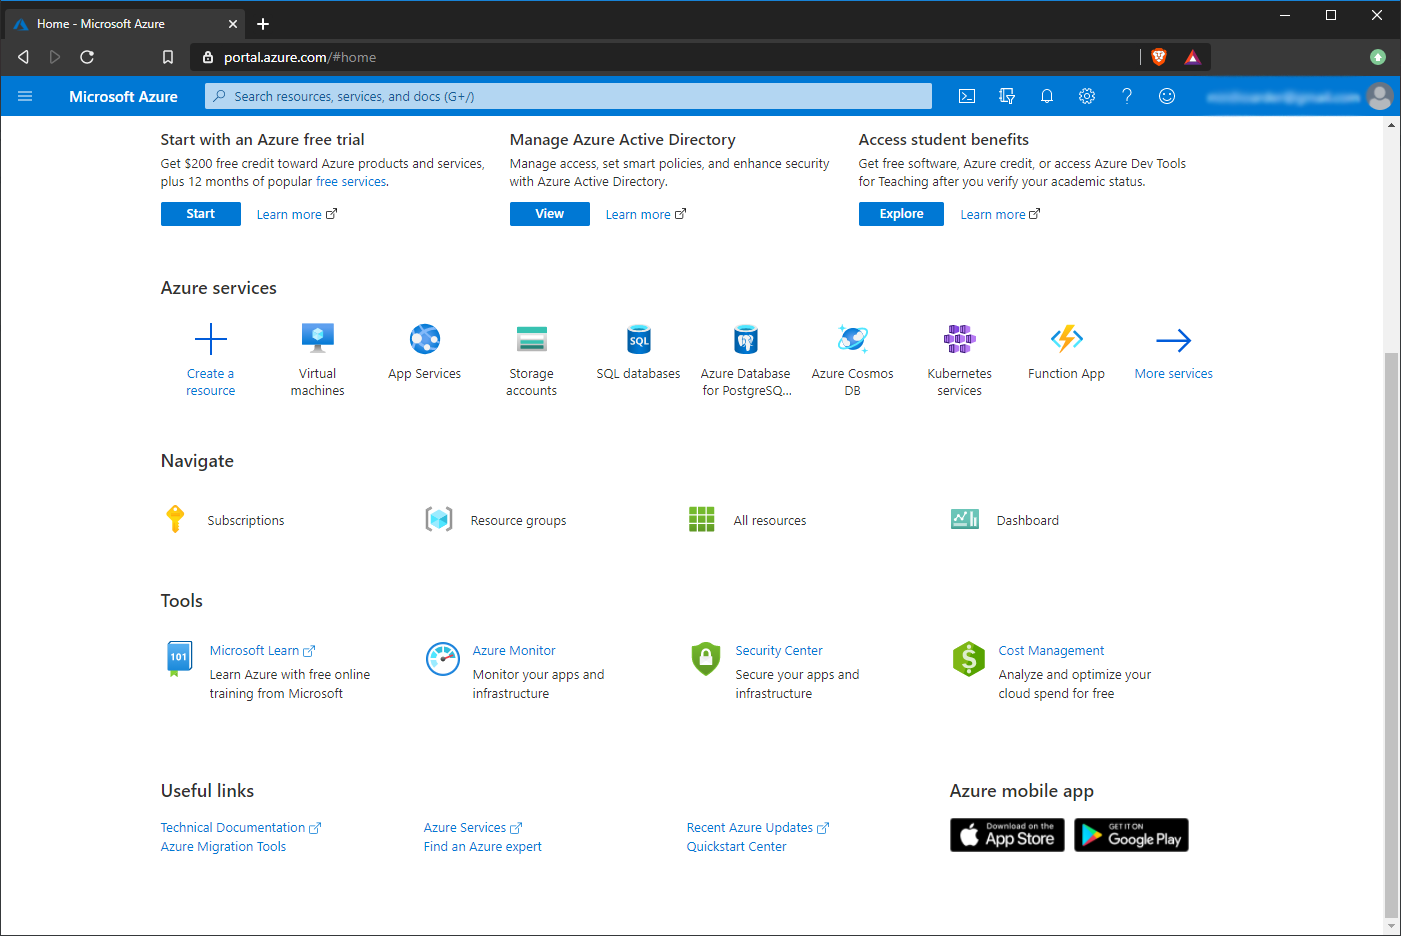
When you first log in, you should see a screen similar to the following (though if you’re logging in for the first time, you’ll likely also see some other notices as well):
The first thing we’ll address are the two overarching services that will tie all of the others together. To do this, we’ll create our subscription as well as a resource group.
Creating a Subscription
To create a subscription, click on the “Subscriptions” link found underneath the Navigate menu, as shown in Figure 1. This will take you to the main Subscription panel. From here, we’re going to hit the “+ Add” button, shown in Figure 2.

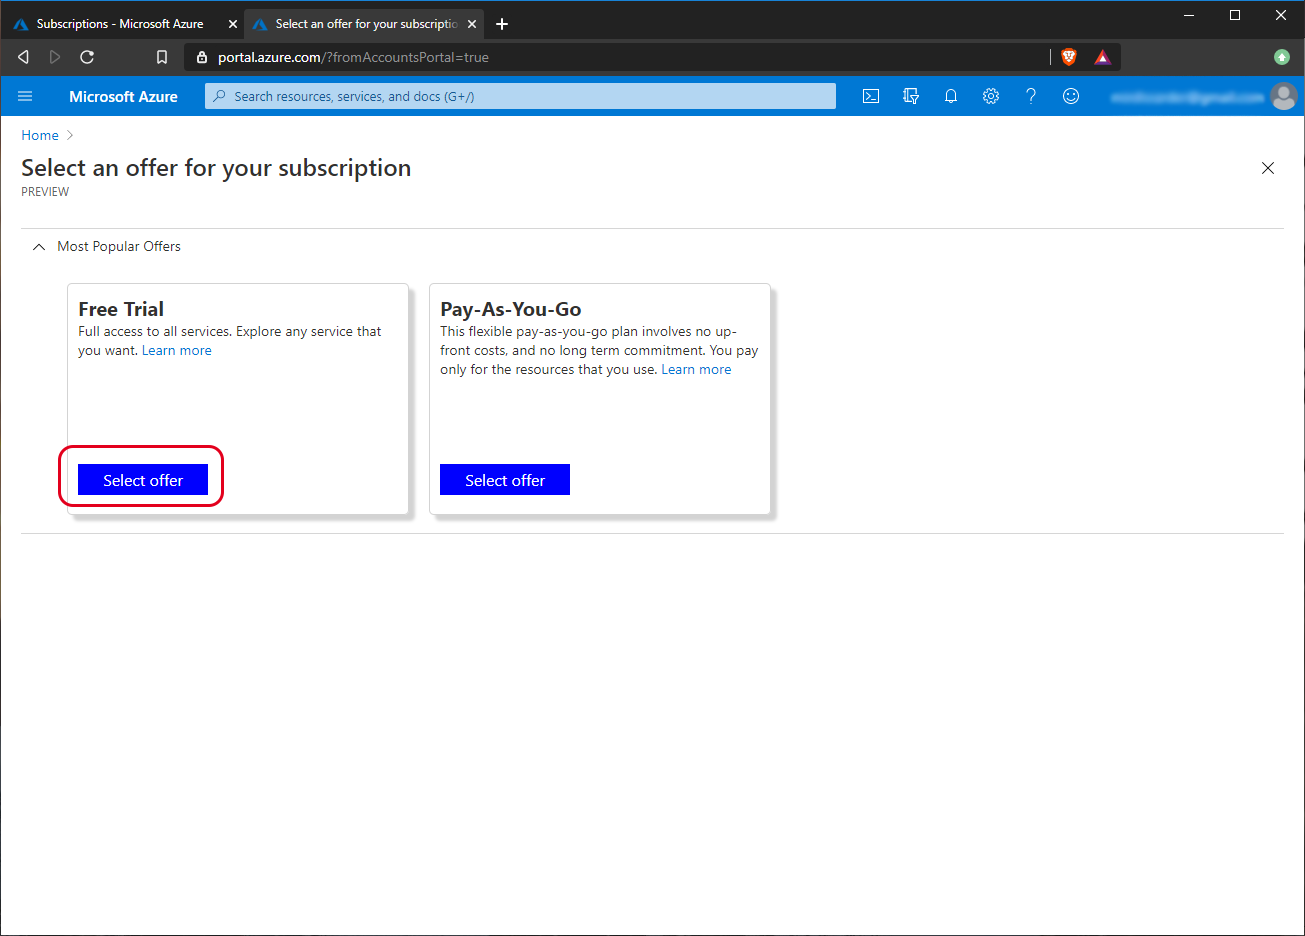
If this is your first time setting up a subscription, you’ll be asked to select an offer for your subscription. At the time of this writing, the offers are “Free Trial” and “Pay-As-You-Go”. Since this is just an example application (and because we didn’t just fall off the back of a turnip truck yesterday), we chose “Free Trial”. This gives you access to all of the services and $200.00 in credits within a 30 day period time period. To do this, click the “Select Offer” button, as shown in Figure 3.
At this point, you’ll be redirected to officially sign up for Azure. They’ll ask you for some personal information, as well as a credit card to save for your account. This is shown below in Figure 4, but it’s all pretty standard stuff for cloud service providers.

After you’ve finished this form and submitted it, you’ll be taken to the “Quickstart Center”. There’s a lot of really interesting tutorials and guides here that are worth looking at. However, we’re on a mission, so feel free to close this tab, and the tab showing the “Offers”, and return back to our main Subscription panel, as shown above in Figure 2.
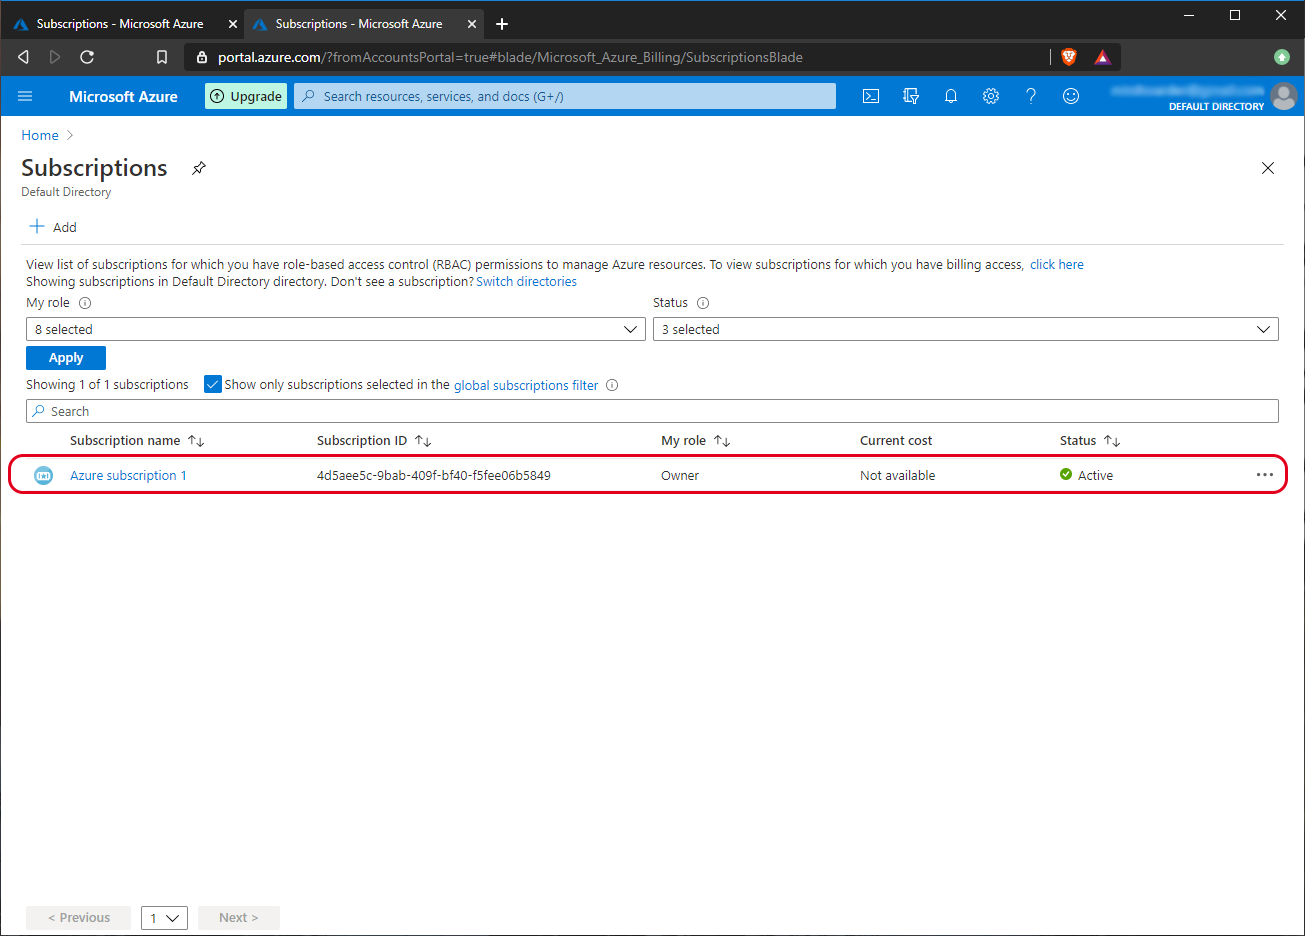
You might have to give the system time to propagate your request, but eventually you should see your new subscription displayed. When we did this, it was given the creative name, Azure subscription 1, as shown in Figure 5.
As we mentioned before, we’re not really going to interact much with this subscription, other than to have other instances of services assigned to it. So, without further adieu, let’s move on to creating those other instances, starting with a Resource Group.
Creating a Resource Group
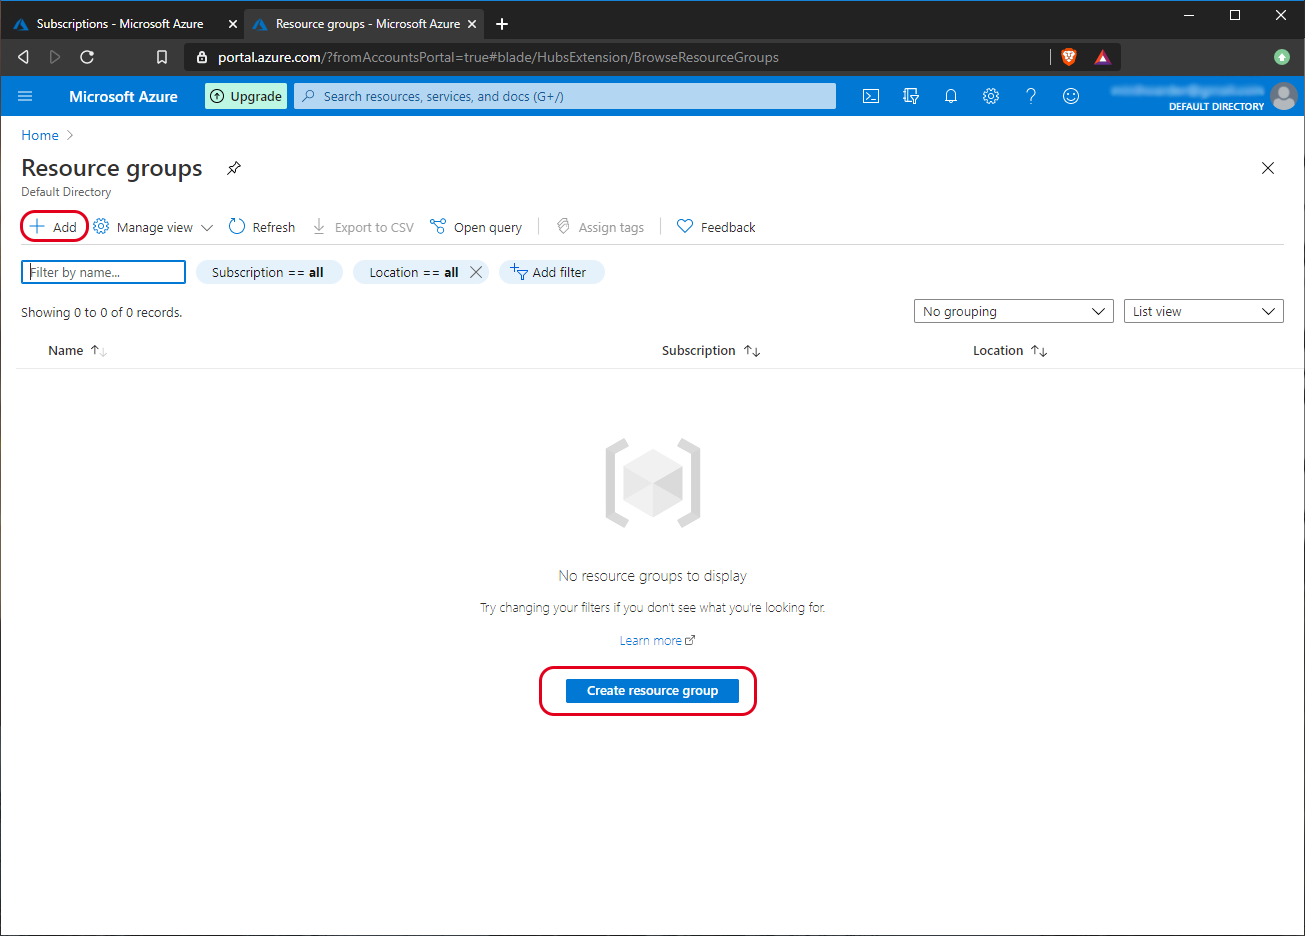
From our home panel, let’s hit the “Resource Groups” button, listed under the title, “Navigate”, as shown in Figure 2. The first time you come to this panel, you’ll see a few menu options, and a message in the middle of the screen telling you that you don’t have any resource groups. Let’s fix that now by hitting the blue button in the middle of the screen labeled, “Create resource group” as shown in Figure 6. Alternatively, you could hit the “+ Add” button, which is what you’ll have to do in the future.
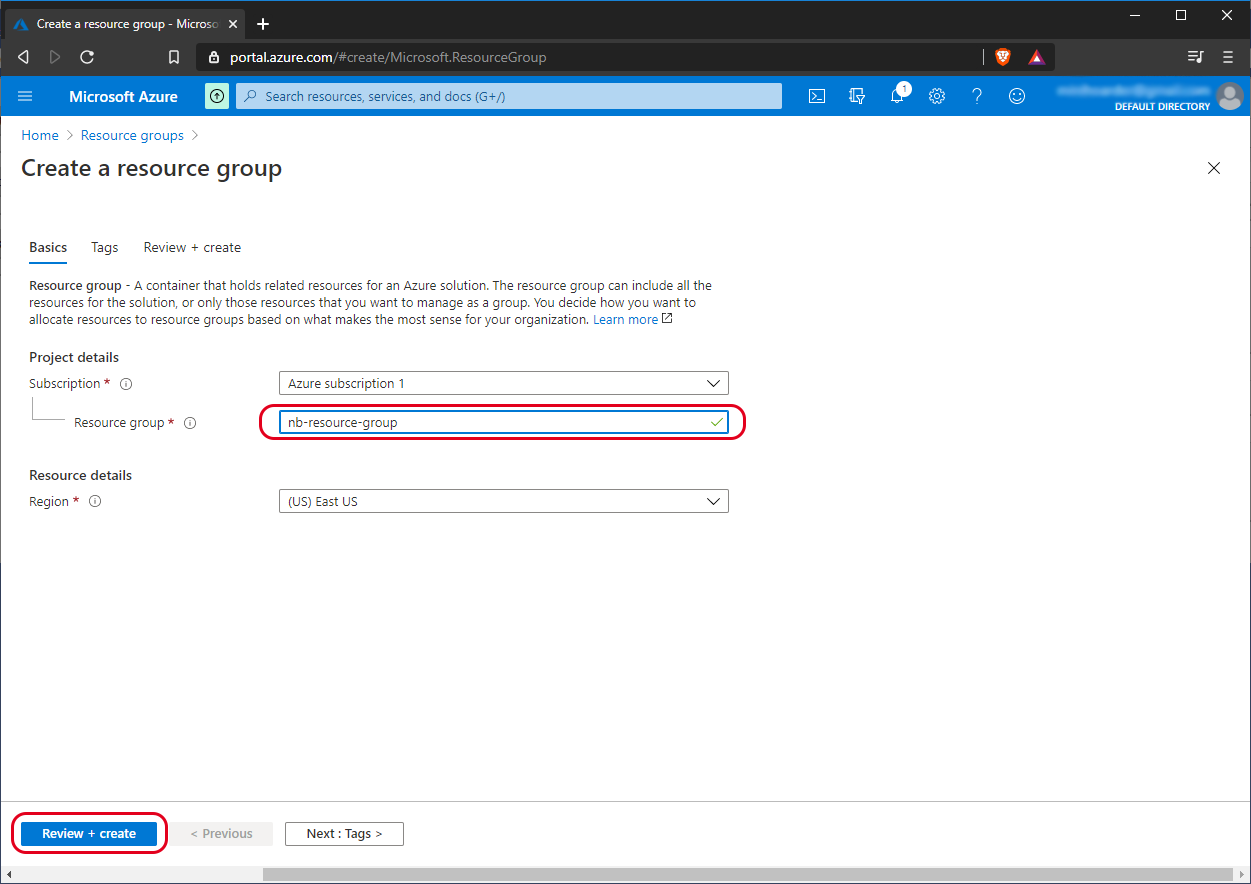
This will take you to a screen where you’ll need to assign a subscription for your resource group, which is already pre-filled with our current subscription, and provide a name. For this, we will go with nb-resource-group. Creative, we know. We’re not going to use tags in this example, so once we’ve provided a name, we’ll hit the “Review + create” button located in the bottom left, as shown in Figure 7.
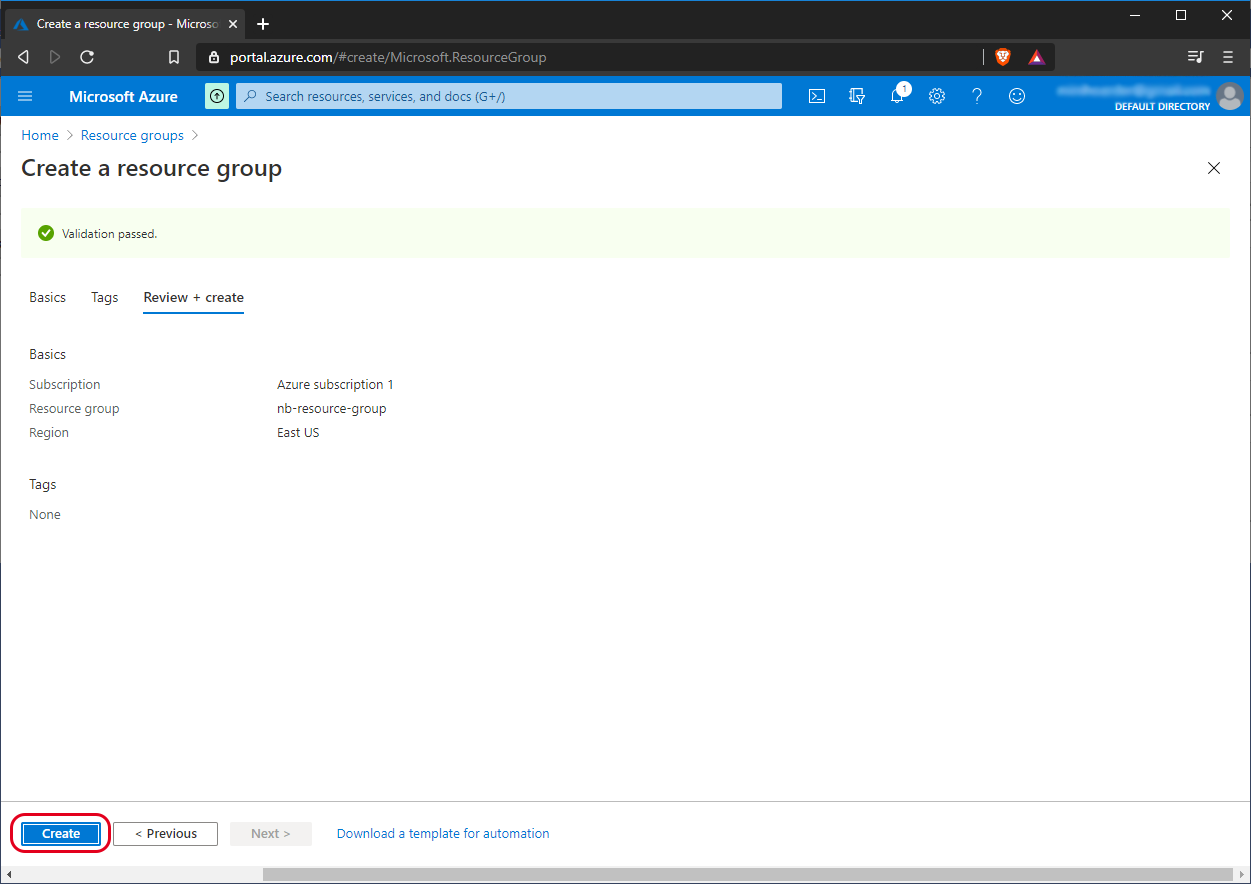
The next screen just shows us a review of what we’ve chosen. Go ahead and hit the “Create” button labeled in the bottom left, as shown in Figure 8.
When that’s completed, you will be taken back to the Resource Group panel, where you should see your newly created group listed, as shown in Figure 9. Let’s navigate back to the main panel, where we’ll start to create instances of some of the more meaningful services, such as the IoT Hub.

Creating an IoT Hub
You might notice that unlike the Subscriptions and the Resource Group buttons, there’s nothing to be found for the IoT Hub service under the main “Navigate” header. Never fear, however. We won’t be that easily dissuaded. Up near the top, you’ll find a search bar. Type in “IoT Hub”, and click on the resulting service listed with the same name, as shown in Figure 10.

If the next screen you see gives you dejavu, don’t worry. It looks a lot like the Resource Group screen from above, down to the big blue button in the middle, but rest assured, you’re on the right page. Let’s move forward by clicking on that blue button labeled, “Create IoT hub”, now, as shown in Figure 11.

Creating an IoT Hub is a little more interesting than the subscription and the resource group was. We’ll step through the IoT Hub creation wizard, first selecting the Resource Group we just created above, and giving our IoT Hub instance the clever name of nb-test-hub, as shown in Figure 12.

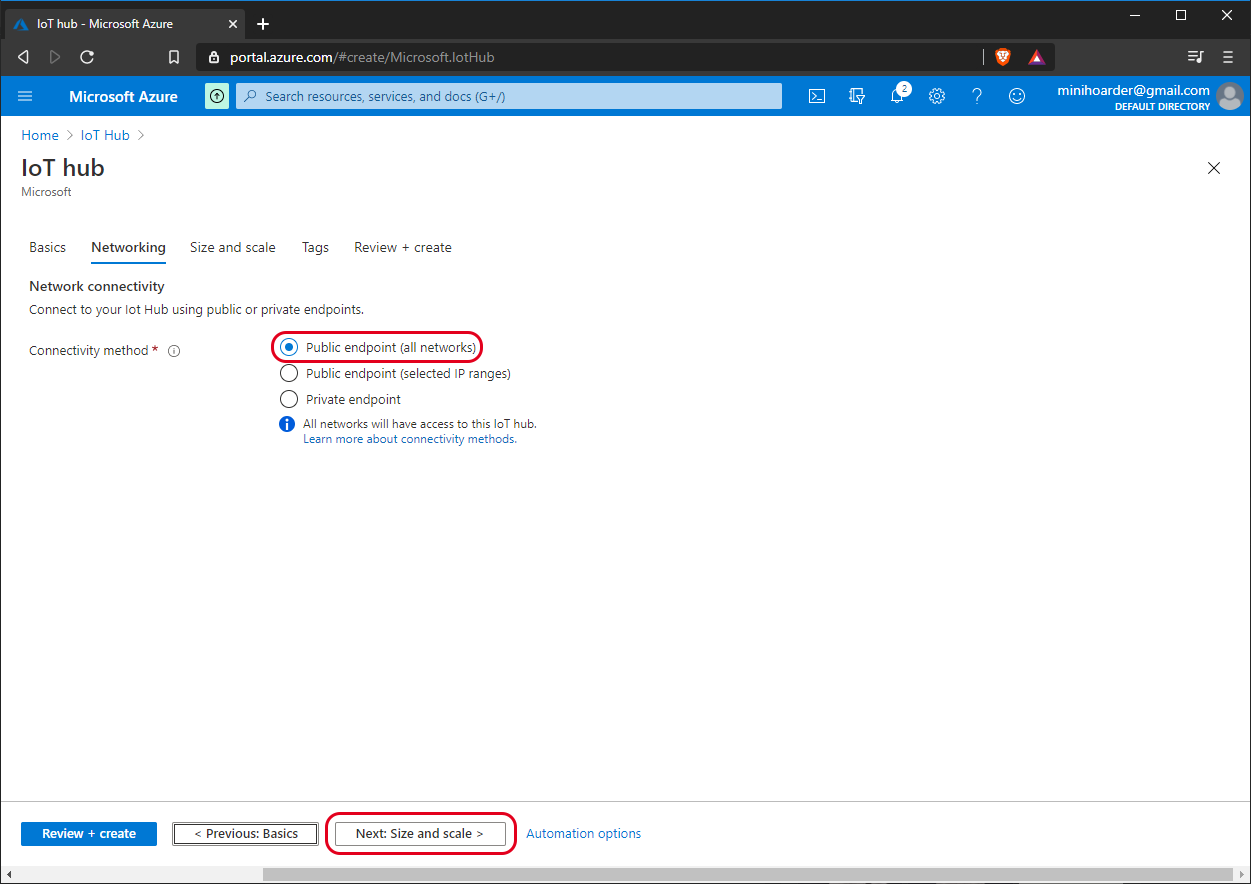
We’re not really going to change anything on the Networking page. Just make sure that your “Connectivity method” is set to “Public endpoint (all networks)”, as shown in Figure 13. Please note that we’re choosing this for the sake of simplicity. In a real application, you’ll want to review this and pick an option that provides the best level of security for your application’s requirements. Once we’ve made sure our settings are correct for this example, hit the button labeled, “Next: Size and Scale”.
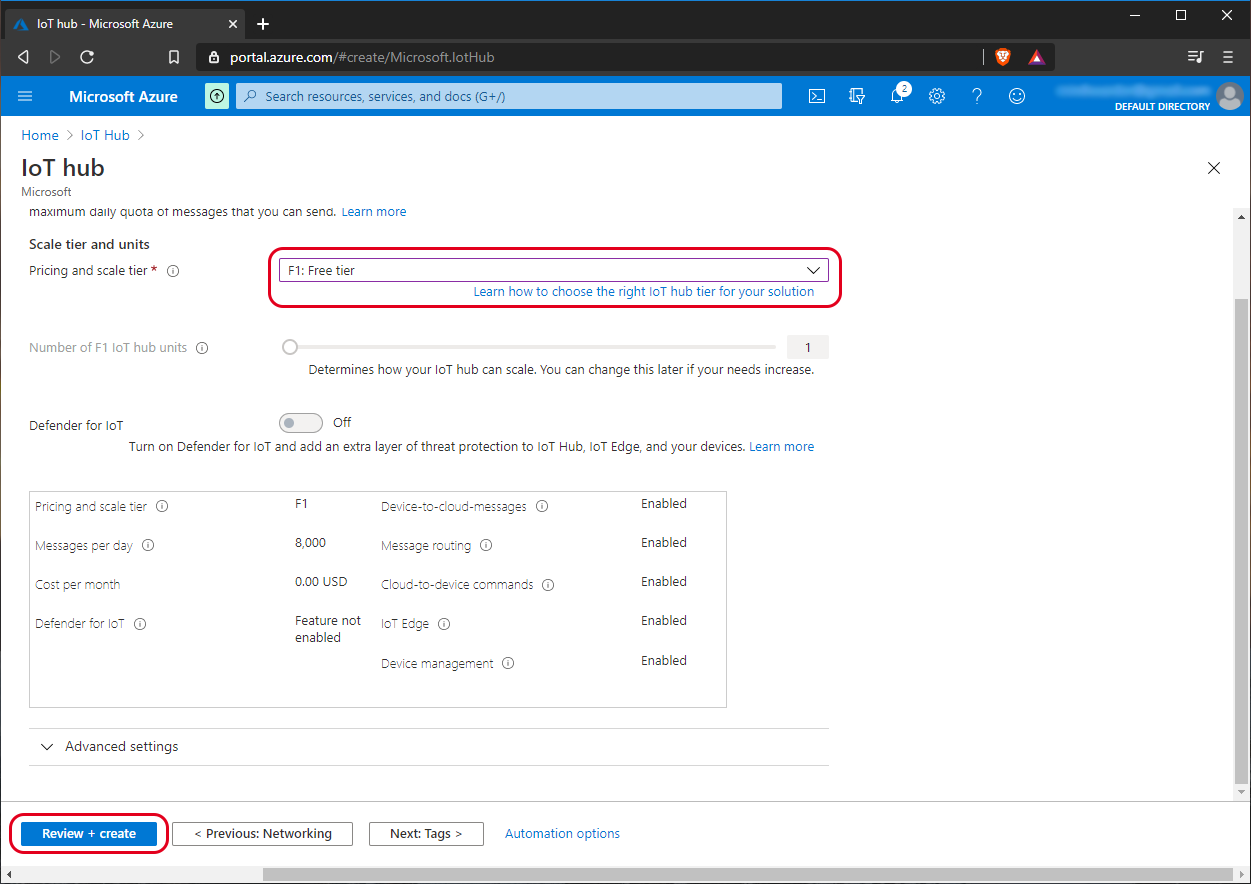
This screen lets you pick a scale tier, which will dictate how many messages per day you’re able to send. Since this is an example, we’ll be choosing, “F1: Free tier”, which, interestingly enough is not the default option. Once you’ve made your choice, we’re again going to bypass the tag selection, so go ahead and hit the button labeled “Review + create” down in the bottom left corner, as shown in Figure 14.
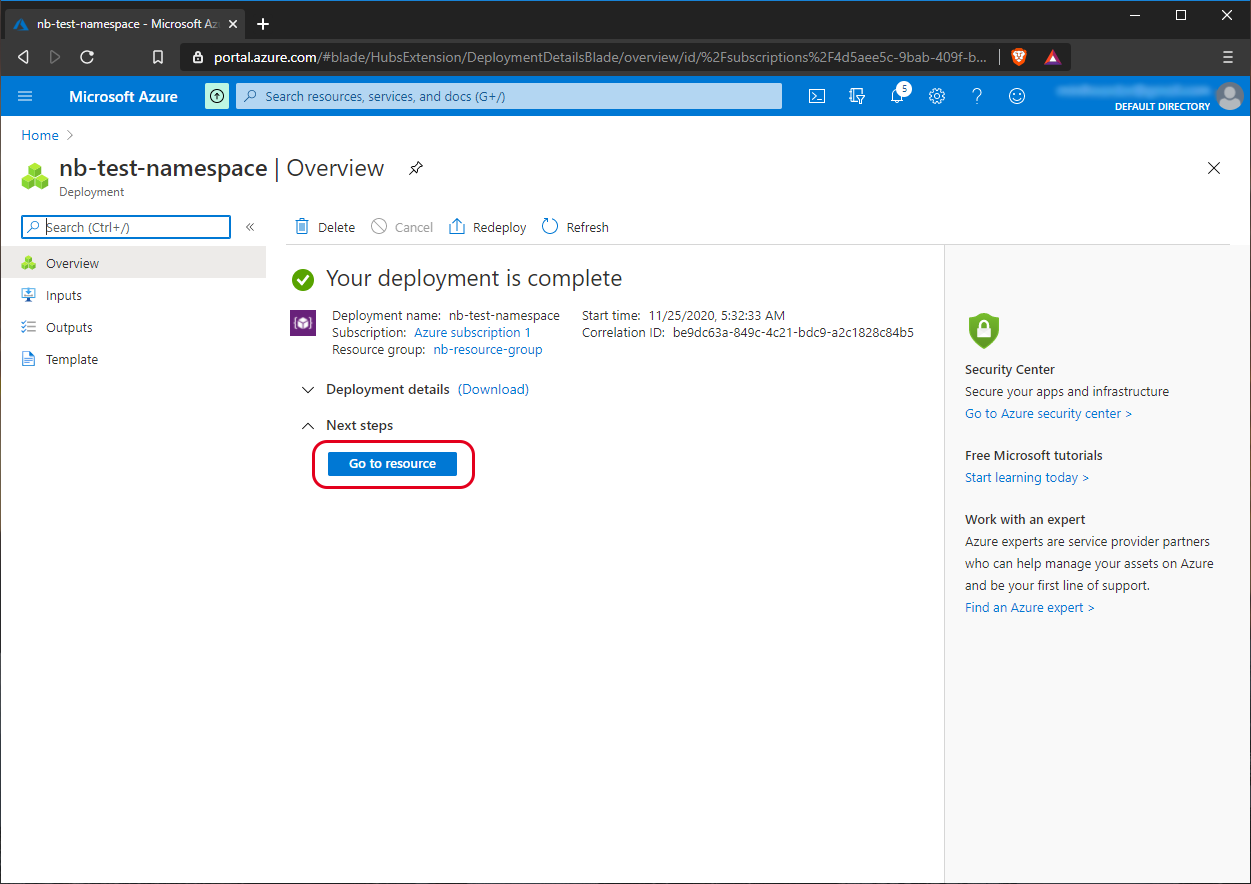
This will take us to a screen where we get one last chance to review our Azure IoT Hub instance. Once you’re satisfied with the choices, go ahead and hit the “Create” button. This should take you directly to your newly created IoT Hub’s overview page with a message that will eventually tell you your deployment is complete, as in Figure 15 below. From here, we’re going to hit the button labeled, “Go to resource”.

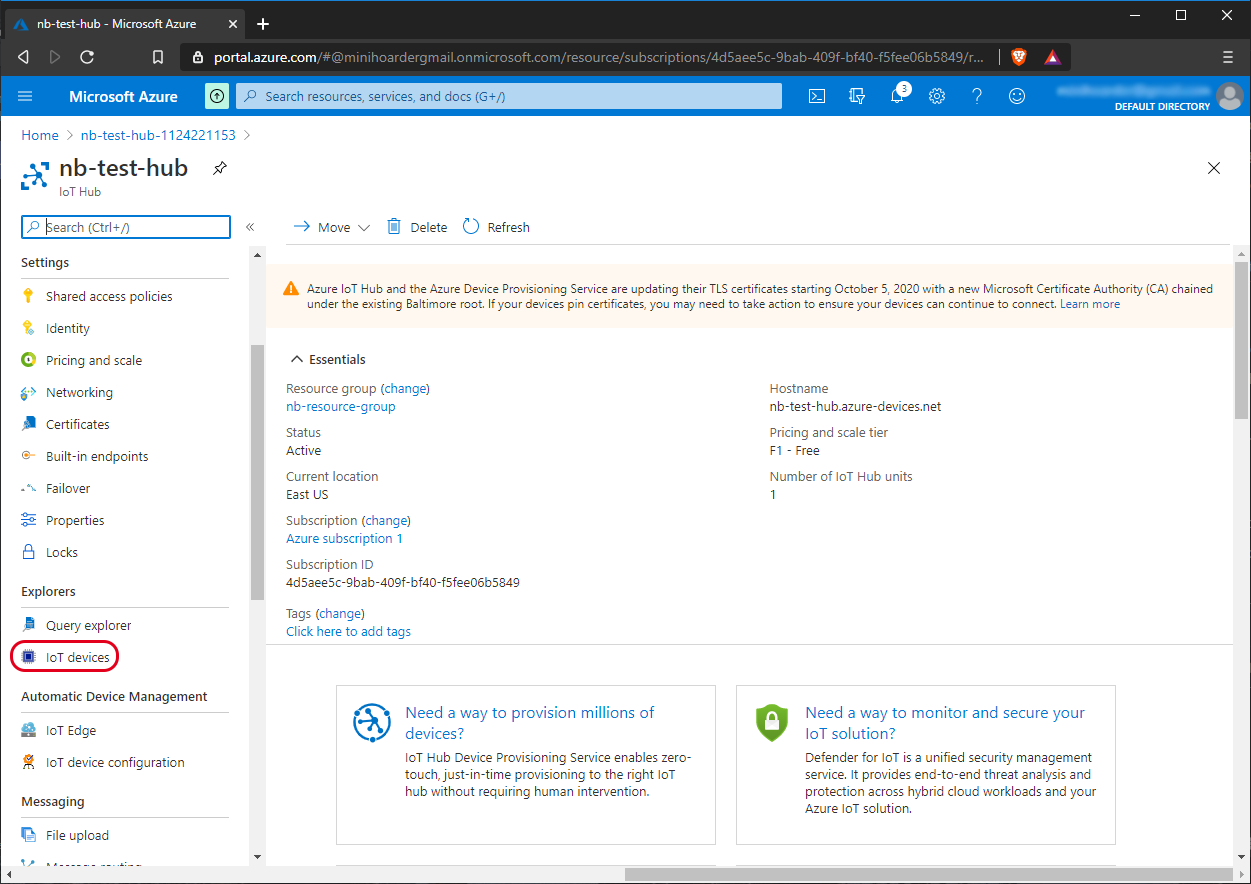
This will take us to the main Azure IoT Hub instance panel, as shown in Figure 16. At this point, we’re going to scroll down the left side and hit the button labeled, “IoT devices”, which can be found under the “Explorers” heading.
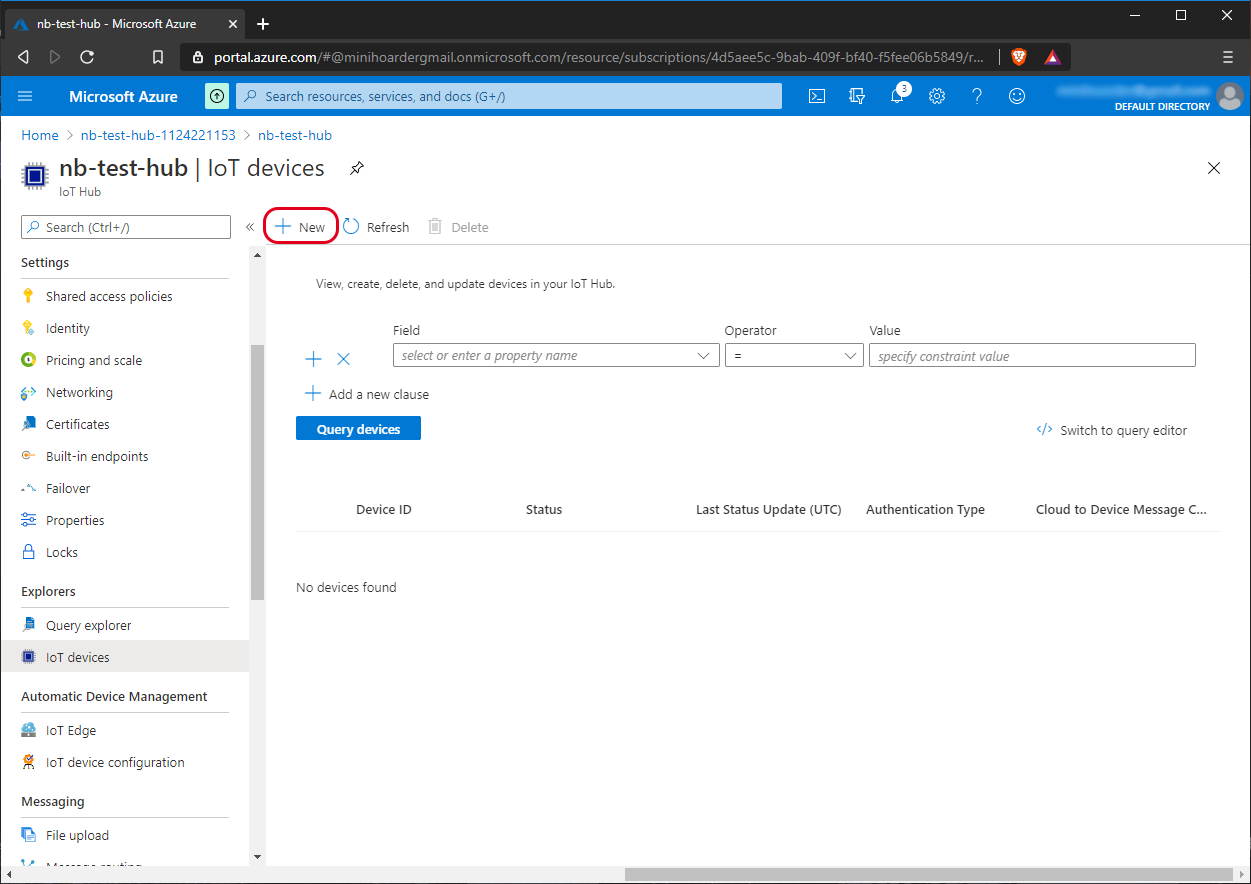
Doing this will take you to the “IoT Devices” page. Here, we’re going to go ahead and add an entry for the MODM7AE70 module we’ll be using to send our MQTT packets. To get started, hit the “+ New” button near the top of the page, as shown in Figure 17.
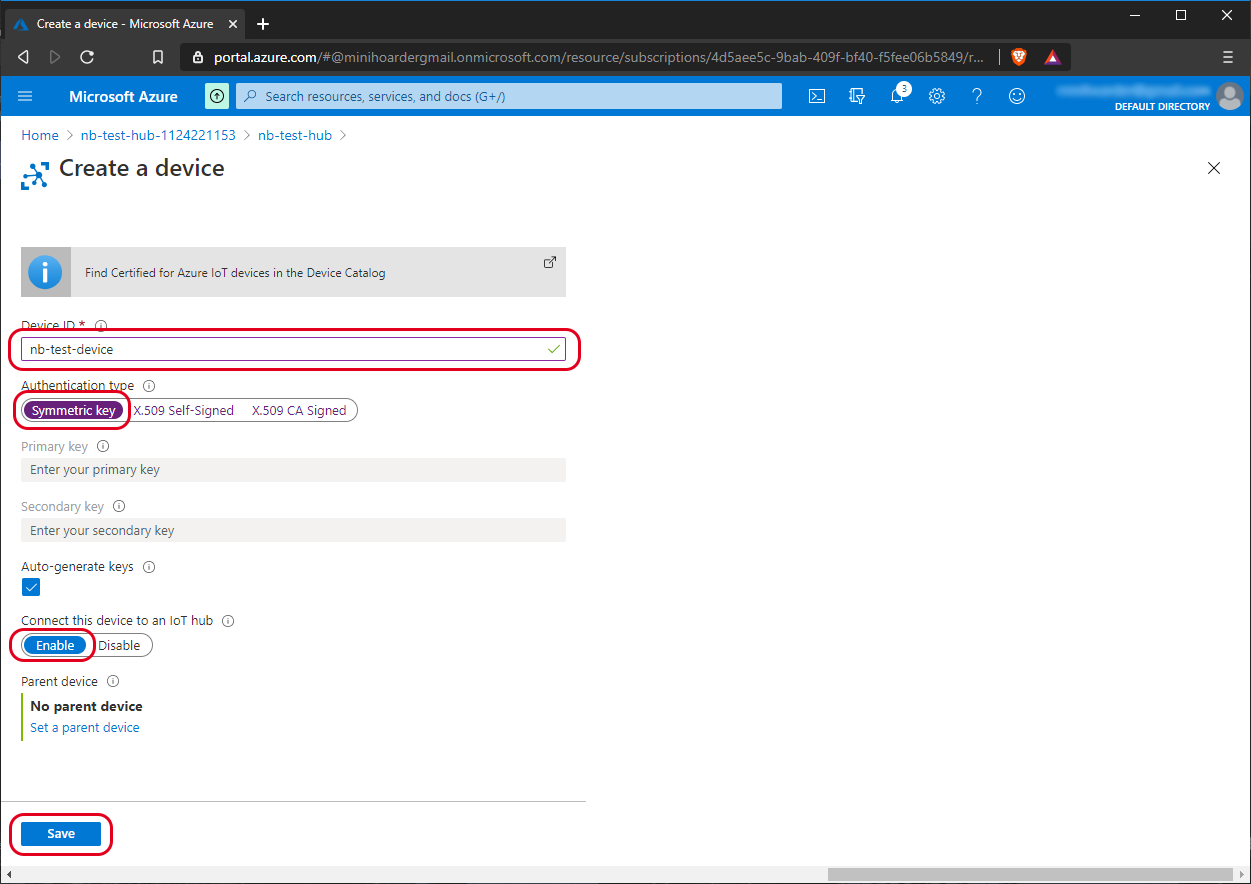
This will bring us to the “Create a device” wizard. As with most of the other screens so far, we’re really only going to modify one thing, and that’s the Device ID. We’ll set this to “nb-test-device” (you’re probably noticing a theme at this point).
The rest of the fields we’ll leave as is, but let’s point out that we’re going to use the symmetric key authentication type. This is the most straightforward to use and is a good choice for this example. In your production deployments, you might consider using a X.509 certificate instead for the added security. We’re also going to make sure that the device is able to connect to the Azure IoT Hub service by leaving that option enabled. Your wizard should look similar to ours, as shown below in Figure 18. When it does, go ahead and hit the “Save” button in the bottom left.
This should take us back to the IoT Devices page shown above, except this time we’ll see our newly created device listed in the main window. Now’s a great time to go ahead and grab the connection string we’re going to need to allow our device to connect. To get this, you’re going to need to click on the device name itself, as shown in Figure 19.
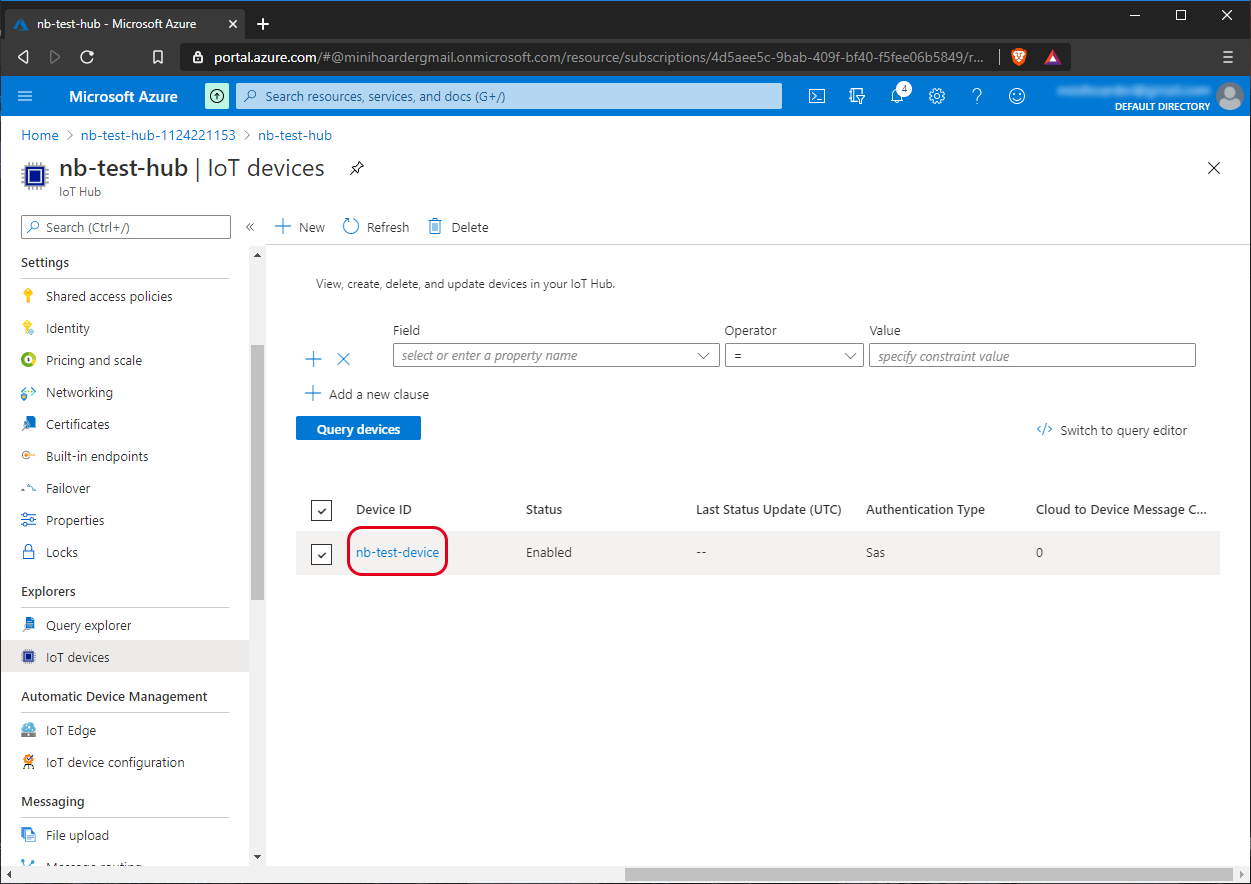
This will take us to the specific device page. Here you’ll see several fields associated with the device. Specifically, we’re looking for one labeled, “Primary Connection String”. We’re going to hit the copy button, which looks like two pieces of paper overlapping, on the far right of the field and then paste this directly into our application. This string will look like a series of dots to keep it hidden (just like every other field on the page), but we’ve made it visible in Figure 20 so that you can see how it’s composed.
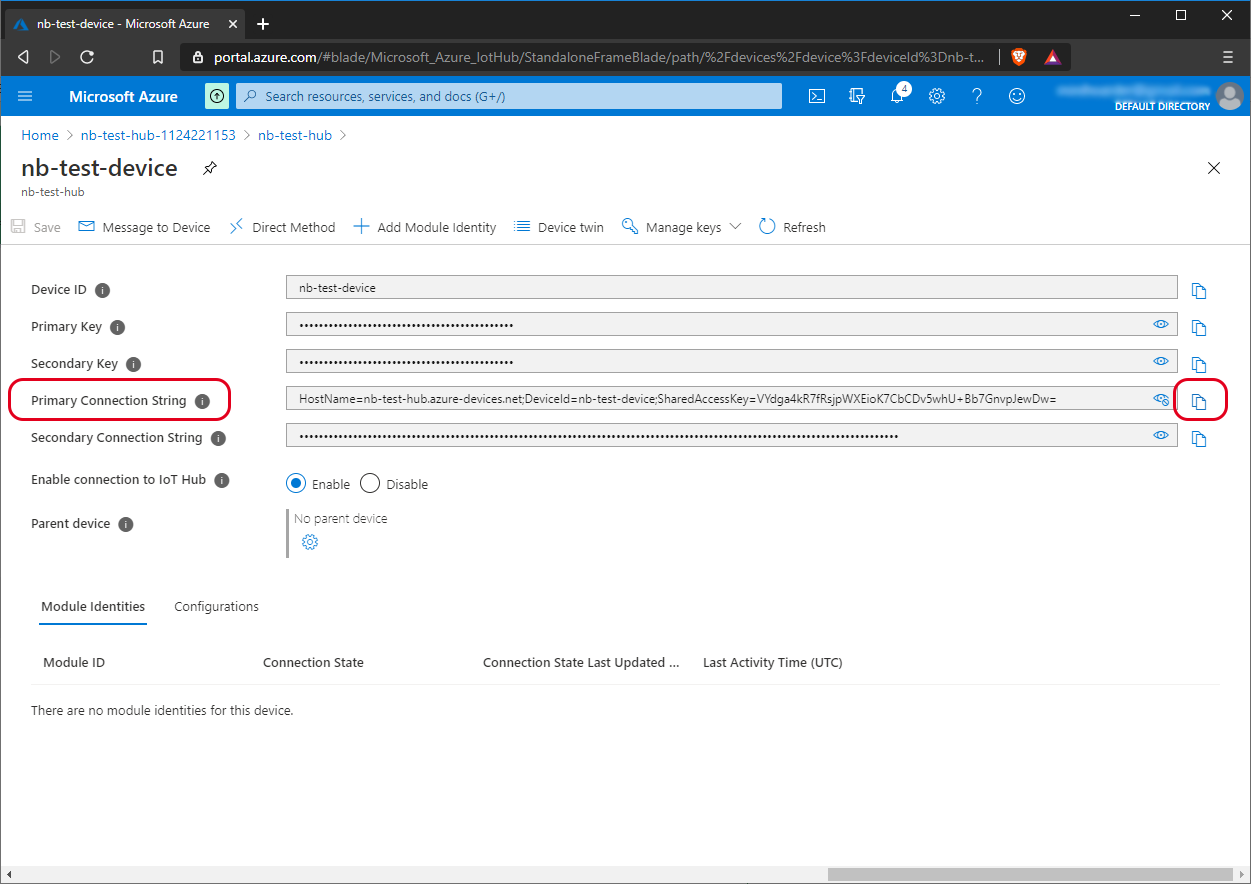
When you’ve copied this string, open the file src\post-record-data.cpp from the code base. In this file, you’ll find the variable connectionString defined at the top of the file. Replace the value of this string with what we’ve copied from the primary connection string so that it looks something like the following:
const char connectionString[] = "HostName=nb-test-hub.azure-devices.net;DeviceId=nb-test-device;SharedAccessKey=VYdga4kR7fRsjpWXEioK7CbCDv5whU+Bb7GnvpJewDw=";With that, we’re ready to move on to creating our next service instance, the Event Hub.
Creating an Event Hub
To create an Event Hub, we’ll need to navigate back to the main Azure Services window. Once again, the service we’re looking for is nowhere to be found, so we will need to search for it. In the search bar at the top, type in the magic words, “event hub”, and select the option that’s displayed in the results, as shown in Figure 21.
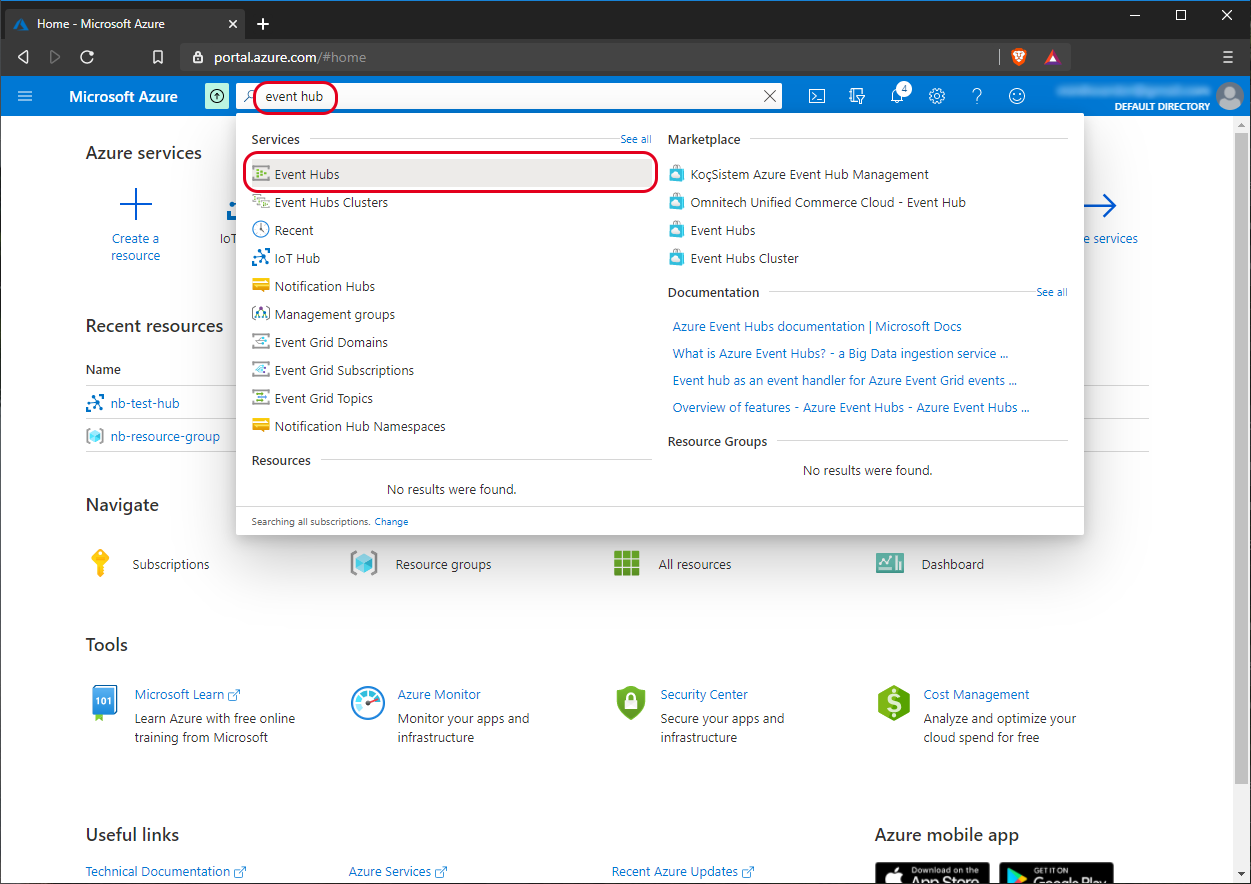
Clicking on this will take us to the main Event Hubs panel. Of course, we won’t see anything listed here, but we will find another big blue button to click near the bottom middle of the screen labeled, “Create event hubs namespace”. Let’s go ahead and do that now. This will take us to the Event Hub creation wizard, as we see in Figure 22.
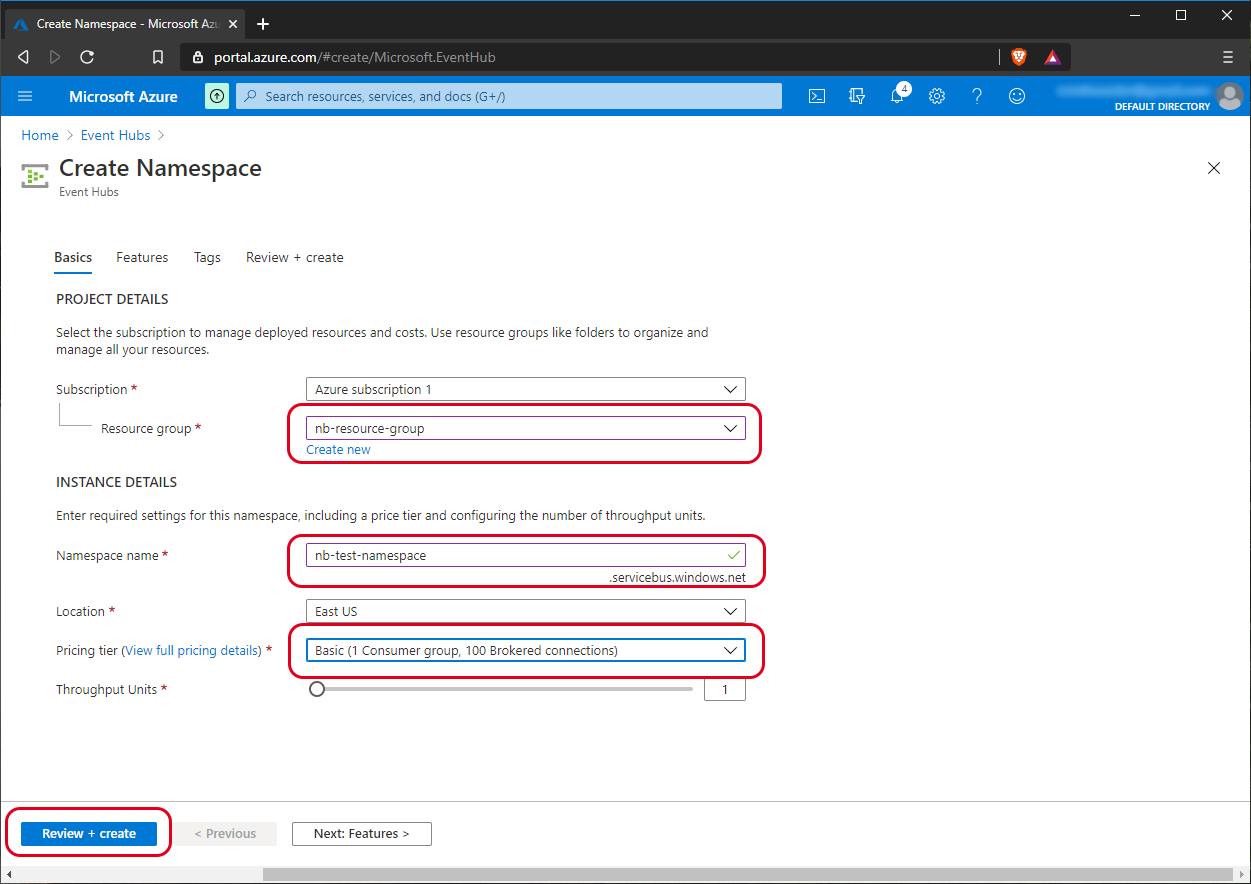
Here, we have a couple of fields to change. We’ll start by selecting our previously created resource group. We’ll also determine a name for the namespace using our patented formula and assign it a value of, “nb-test-namespace”. Finally we’ll pick a pricing tier. Since we’re only using one device, we’ll go with “Basic (1 Consumer group, 100 Brokered connections)”.
At the time of this writing, the Features tab lets you select availability options. In this case, we’re fine with the default values. Since we’re also not really interested in setting up any tags, we’re going to go straight to “Review + create” by hitting the blue button at the bottom left. From here, we’ll simply review our choices, and hit the button labeled, “Create” at the bottom left of the screen.
This will take us to the newly created event hub’s Overview page. When you first land here, it will say, “Deployment is in progress”, but will eventually tell you that your deployment is complete. When you see this message, click on the button labeled, “Go to resource”, as shown in Figure 23.
This will take you to your Event Hub Namespace’s main panel. As you might have guessed, having an Event Hub Namespace is not the same as having an actual instance of an Event Hub. From this screen, we’re going to hit the option labeled “+ Event Hub” near the top of the screen, as shown in Figure 24.

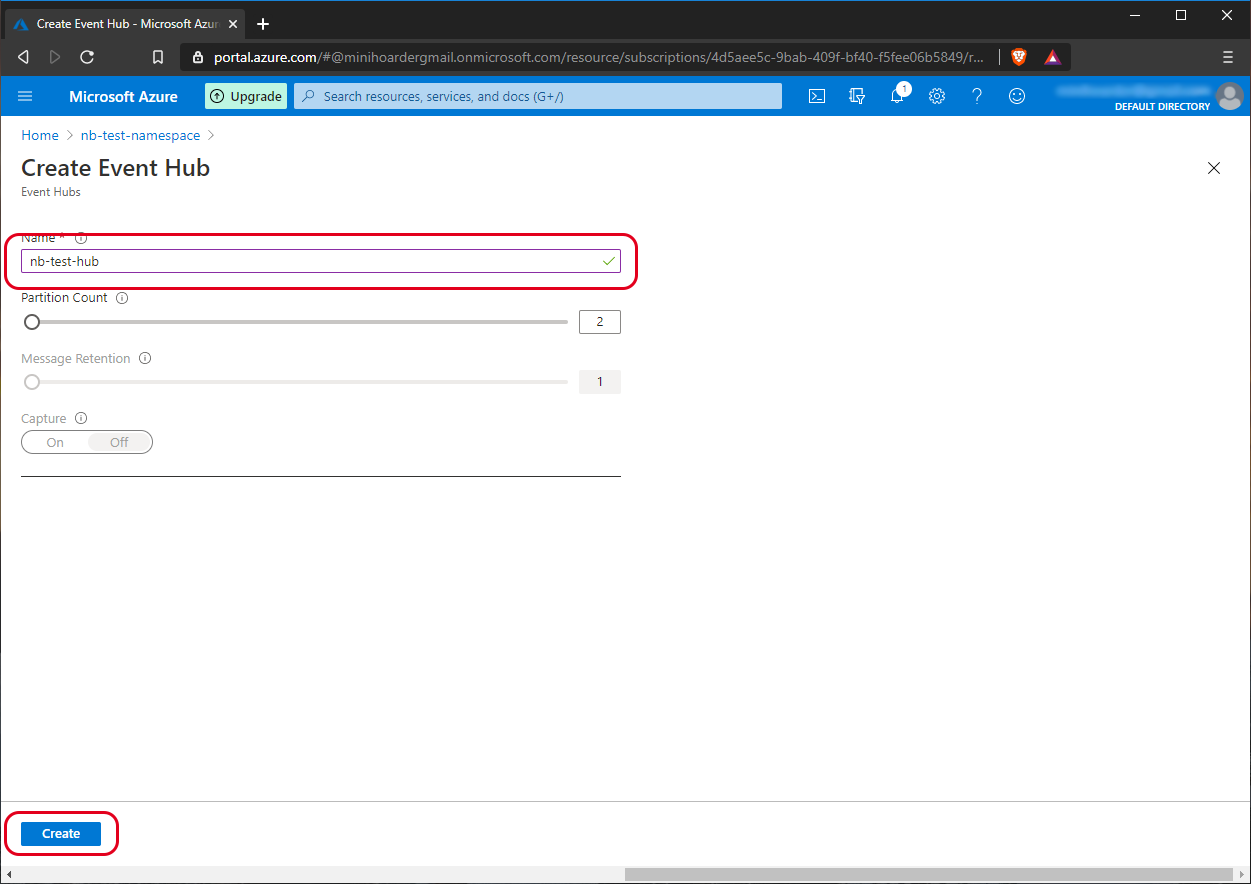
Here we see another creation wizard, this time for the Event Hub itself. The only field for us to fill out here is the name. By this point, you probably don’t even need me to tell you what we’re going to put, but I will anyway: nb-test-hub. Once you’ve come up with your own original name, hit the “Create” button at the bottom left of the screen, as shown in Figure 25.
This should return us back to the Event Hub Namespace page. If we scroll down to the bottom, we’ll see the Event Hub that we just created listed at the bottom of the screen. Just for the sake of completeness, we show this in Figure 26.

Now that our Event Hub is all set up, it’s time to create the piece that will actually send it the messages from our Azure IoT Hub. This piece is the Event Grid System Topic.
Creating an Event Grid System Topic
It’s time to make our way back to the main screen, and again search for a service in the search bar at the top of the page. This time, type in event grid system topic. This should bring up the Event Grid System Topics service, as shown in Figure 27.

Clicking on this will bring us to the all page that looks all too familiar. There’s something to be said for consistency, right? By now you probably know what to do, but just in case, go ahead and click on that button labeled, “Create Event Grid system topics”. This will bring you to the screen show in Figure 28.
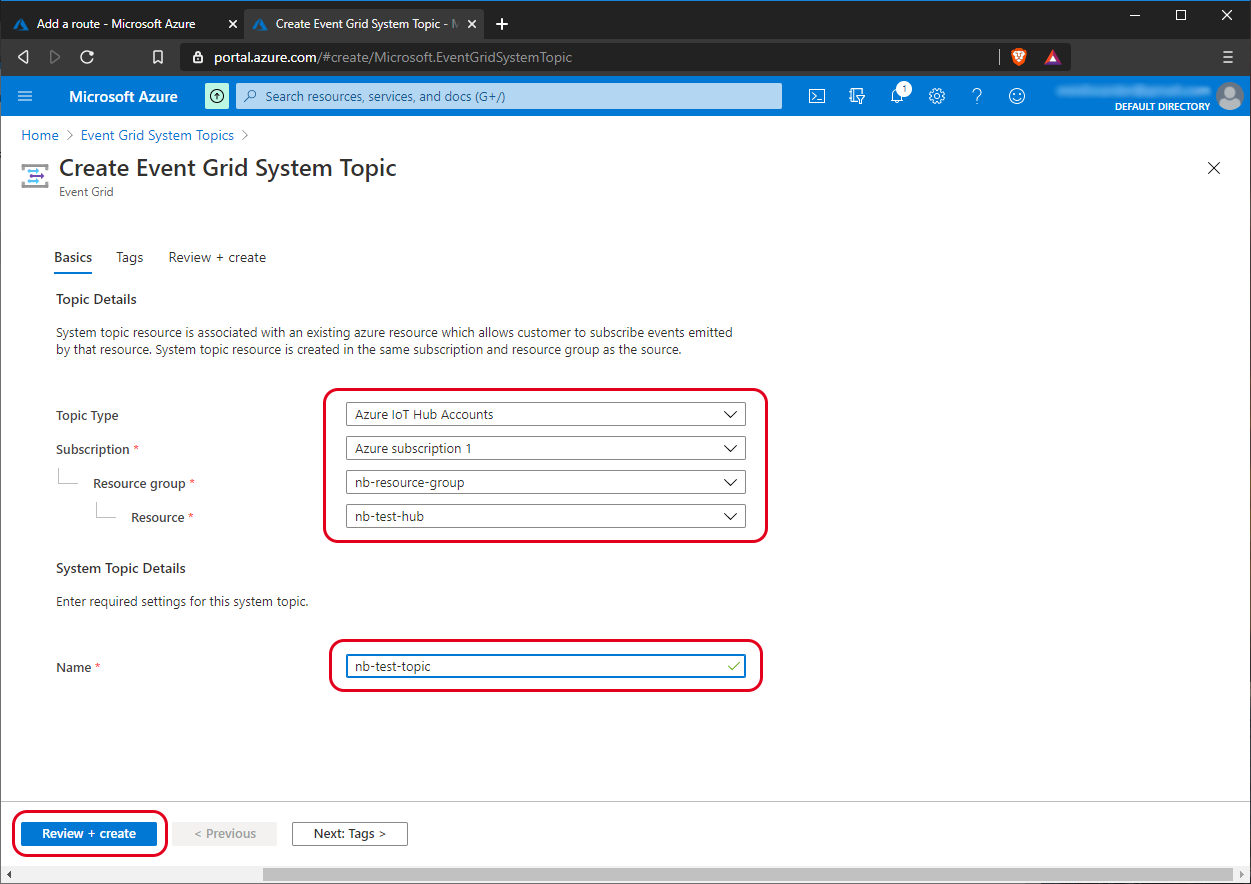
You’ll notice that we have several things to select. We’re going to set the Topic Type to “Azure IoT Hub Accounts”, since this is where the events will be generated from. Fortunately, from here it’s pretty easy since there’s only one option for everything. We’ll go ahead and set the name as nb-test-topic. Like before, we’re going to pass on using tags, so from here we’ll just hit the “Review + create” button at the bottom left of the screen.
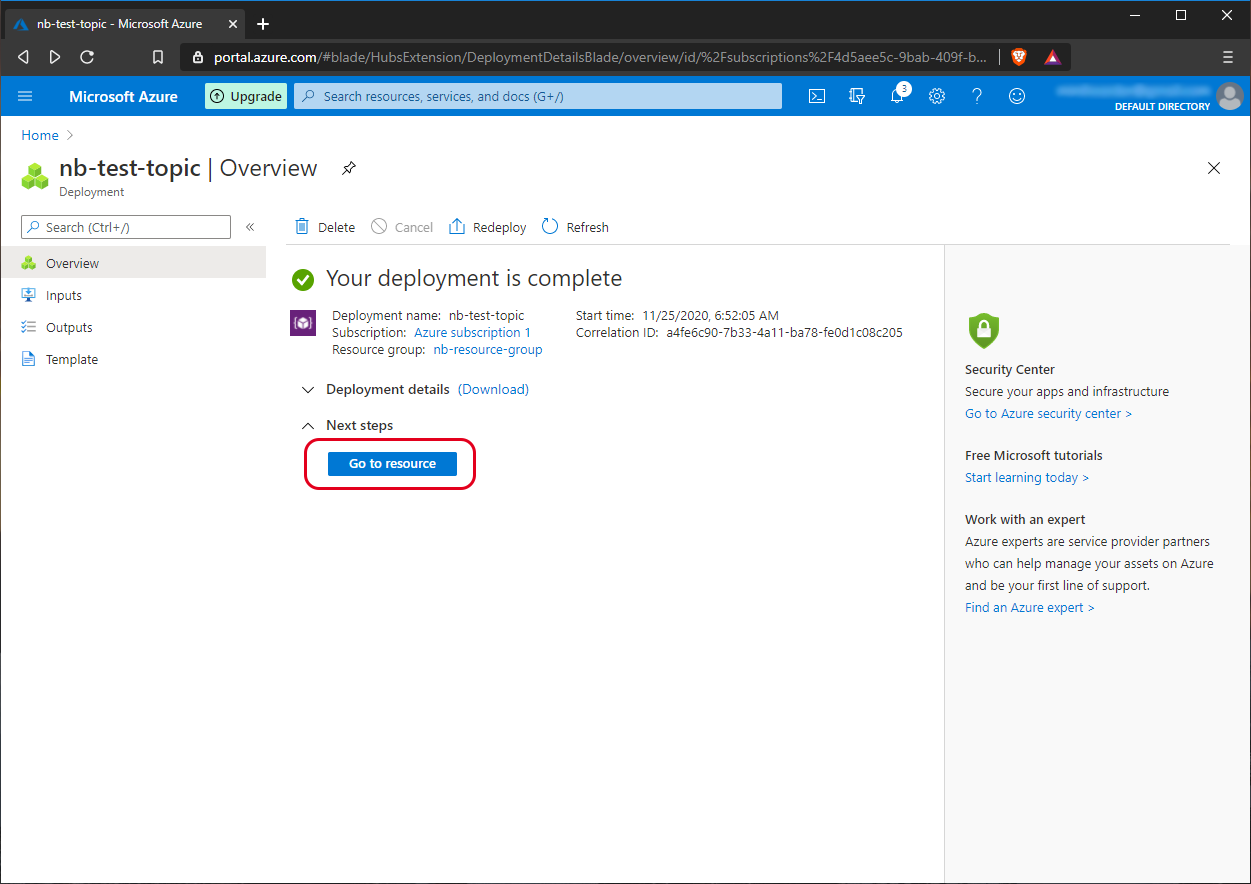
This should take you to a page where you can review the Event Grid System Topic. When you’re satisfied with your choices, hit the blue “Create” button found in the bottom left. This will take us to the topic’s Overview page, where we will eventually see the message, “Your deployment is complete”. Let’s go ahead and hit the button labeled, “Go to resource”, as shown in Figure 29.
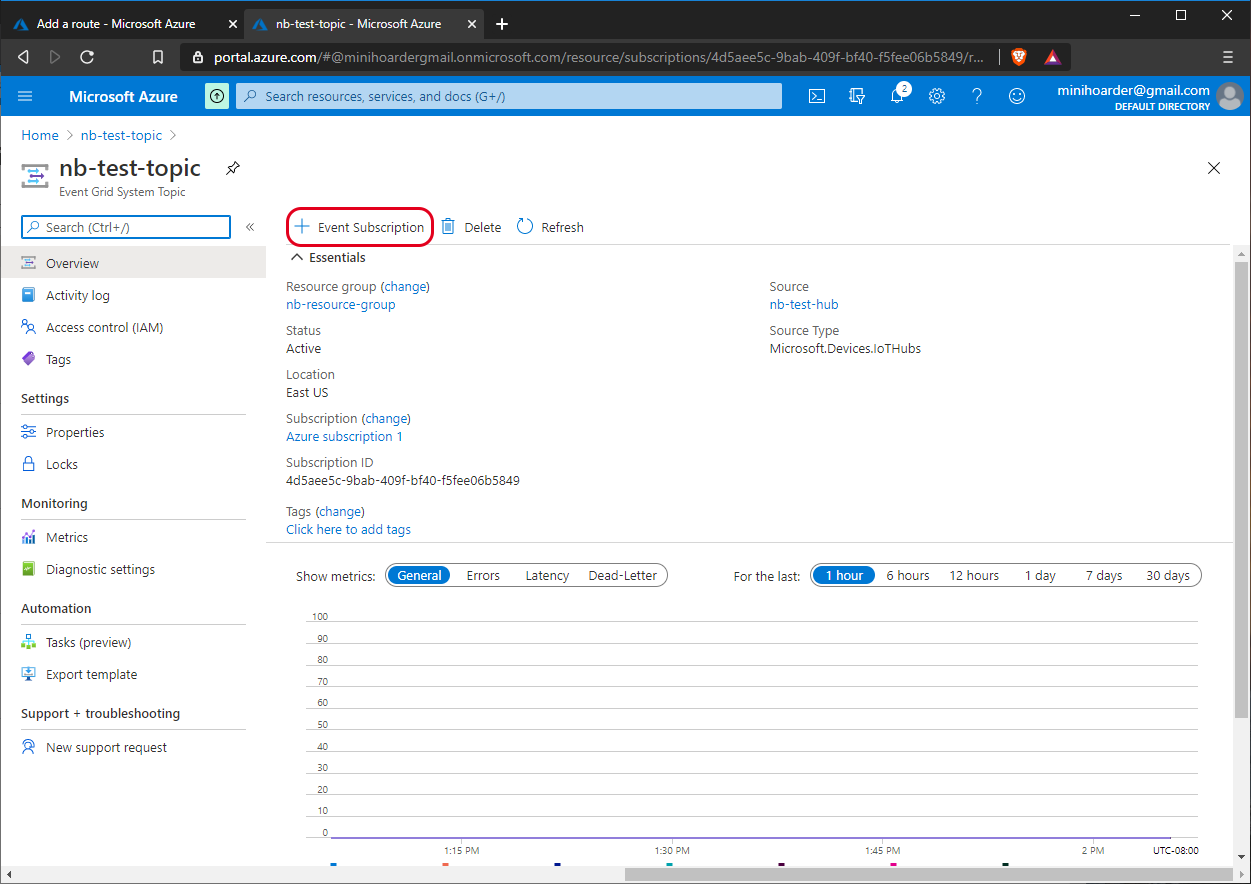
Here we see the main Event Grid System Topic panel. Finally, we need to create an Event Subscription that will trigger whenever our IoT Hub receives a message. To do this, hit the “+ Event Subscription” tab, as shown in Figure 30.
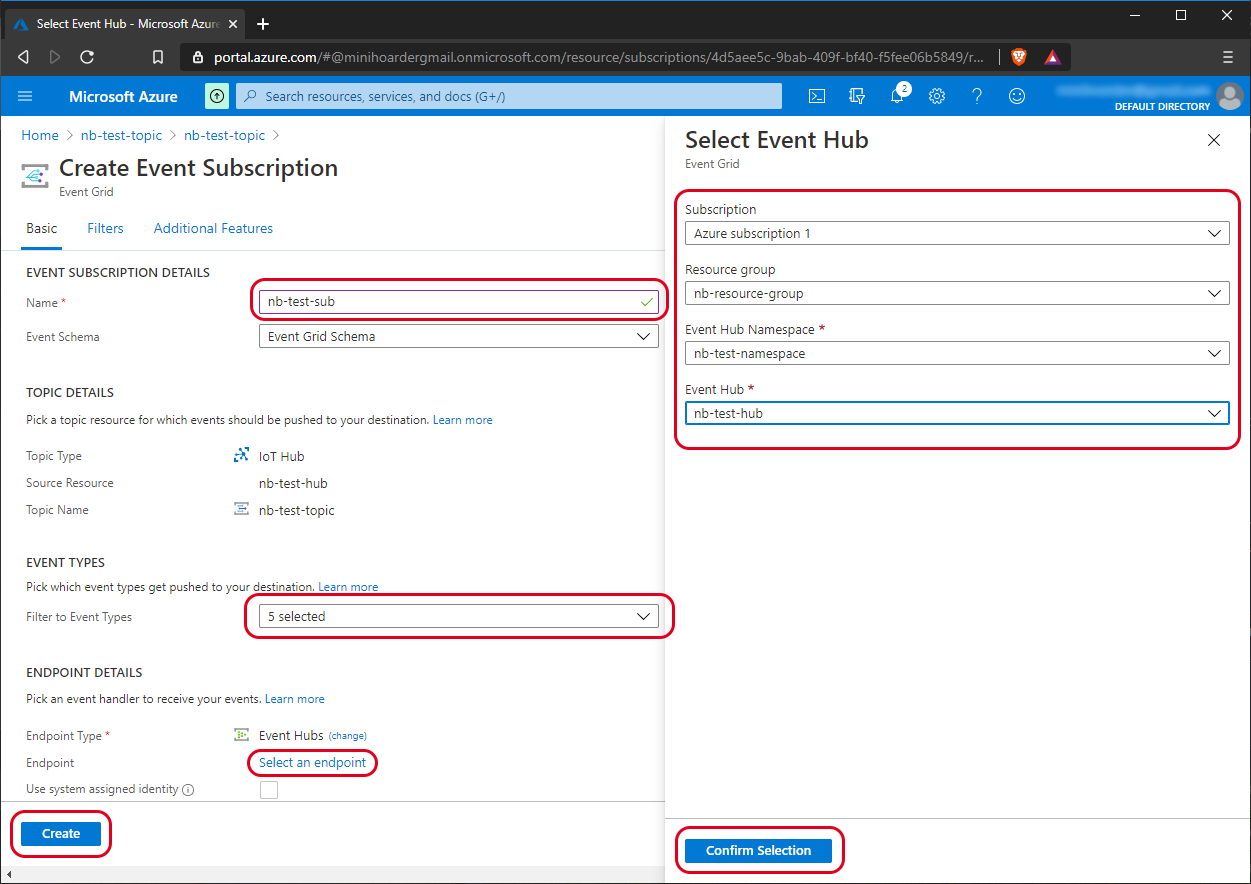
This brings us to the Create Event Subscription panel, which is a little more interesting than some of the others we’ve used thus far. We’ll start by providing a name, which will of course be nb-test-sub. We’ll leave the Event Schema set to its default value of, “Event Grid Schema”.
Under the Event Types header, select the dropdown input labeled “Filter to Event Types” and make sure that “Device Telemetry” is selected. It should now say, “5 selected”. Under Endpoint Details, select the Endpoint Type of “Event Hubs”.
This should open a menu on the right side that will let you choose the subscription, resource group, event hub namespace, and event hub that we created in the previous steps. When you’ve filled this out, hit the “Confirm Selection” button, followed by the “Create” button.
The fields and their values are shown in Figure 31.
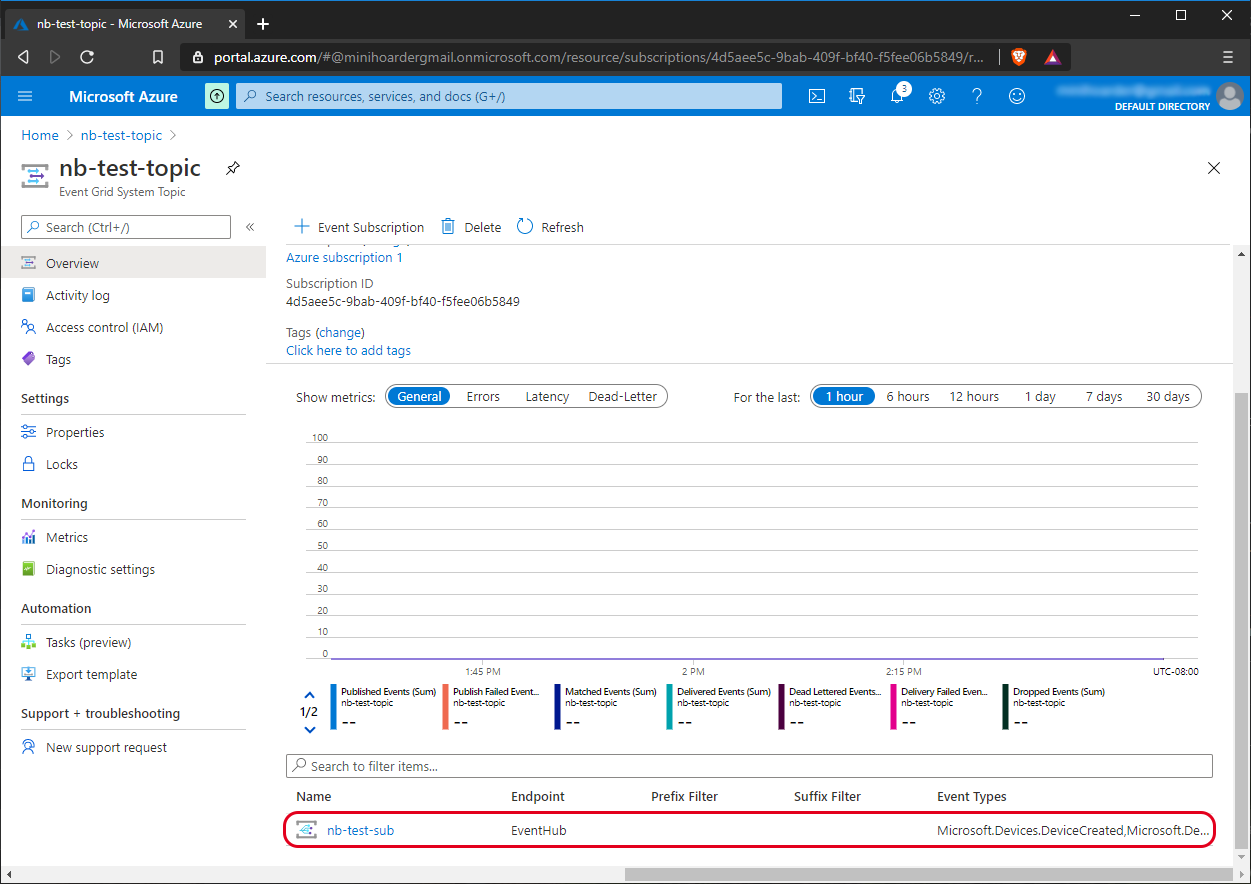
Once the subscription is created, we should see it in the list located at the bottom of the main Event Grid System Topic page, as shown in Figure 32.
We now have all of the pieces in place that will be needed for our example application. Let’s move away from Azure for a moment to look at how to build and load the application onto our MODM7AE70. From there we’ll be able to test the connection and ensure we didn’t miss anything during our setup.
Modifying, Building and Loading the Application
With our Azure services up and running, it is time to turn our attention on getting the application built and loaded onto our MODM7AE70 module. The first thing that we’ll need to do is to get the example code. This can be found from NetBurner’s GitHub repo, here. You can either download it as a .zip file, or clone it to your machine. We’ll then use it to create a project in NetBurner’s custom IDE, NBEclipse. After we have it building, we’ll need to load the application to our device and make sure that it’s getting properly updated.
Make a Project in NBEclipse
To create a project in NBEclipse, first launch the program, which can be found in <NNDK install>\NBEclipse. When you first launch it, you will be prompted to pick a workspace directory. This can be anywhere you like, and will be the location where your project files and source code are stored.
We have detailed information on creating projects in NBEclipse that can be found here. However, we’ll go ahead and cover the basics to get you started on the right foot.
To create a project, we’ll be using the Project Wizard. You can access this by going to File->New->Project, as shown in Figure 33.

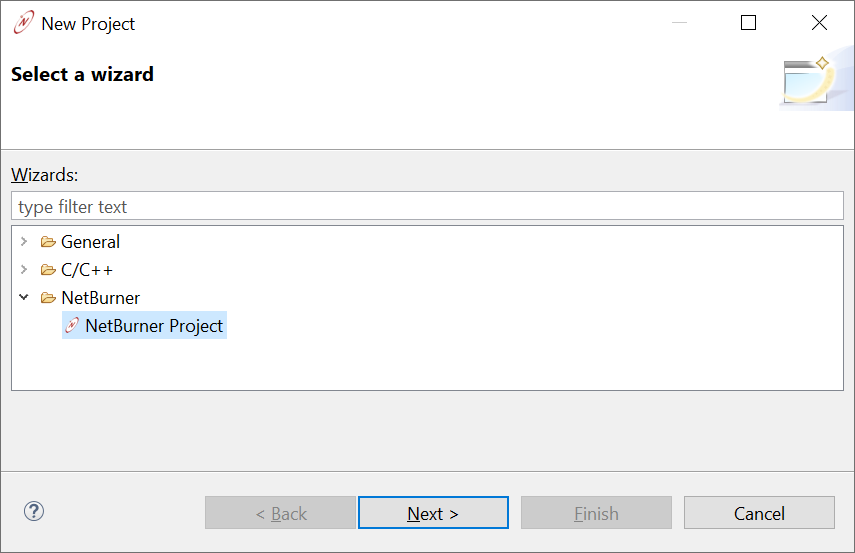
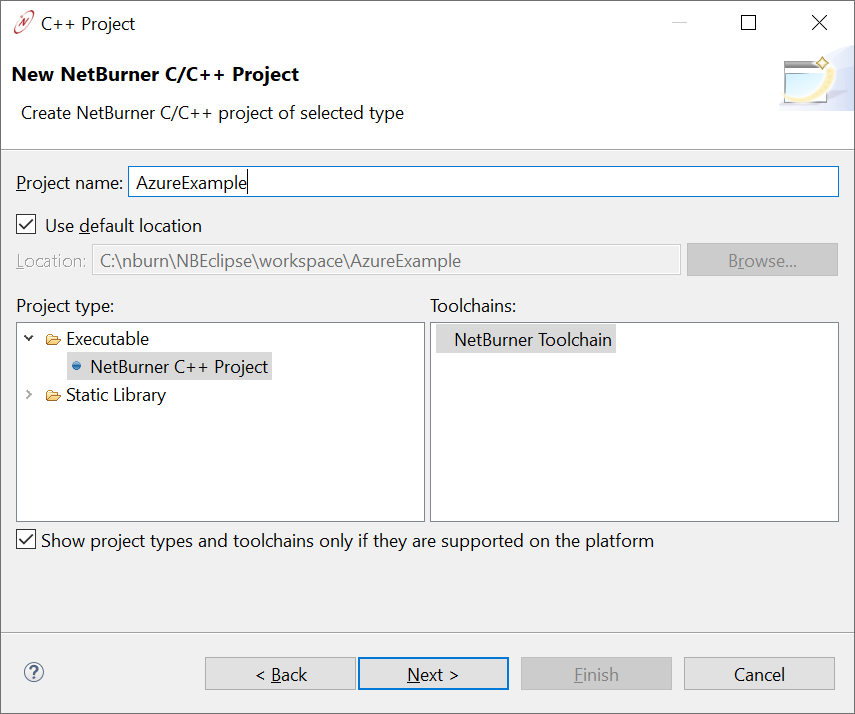
This will open the wizard. The first thing it will ask you to choose is the wizard that you’d like to use. For this example, we will choose the “NetBurner Project”, as shown in figure 34.
The next screen will give us a few options to set, but the only thing we’re actually going to change will be the name. Sticking to our creative streak, we’re going to go with AzureExample.
You can click next, and then next again, leaving both the “Debug” and “Release” options checked. This will bring you to where you can select which module you’ll want to use. If you’ve installed your tools for multiple platforms, make sure to select MODM7AE70. Then, if you know your device’s IP address, you can type it in the appropriate field. Alternatively, you can hit the button labeled, “Search”, and pick it out of the list.

If you’re not sure what your device’s IP address is and it’s not currently on the network you can just pass by this for now and add it later. If we were going to add any of the default initialization or components for our application, we would move on to the next screen. However, since we’re going to be importing an entire example, we can go ahead and hit the “Finish” button.
The first thing you might notice is that the application tries to build right away. Of course it’s going to fail, seeing as how we don’t have any code yet. Let’s fix that now by importing our example code into our project. We can do this by right clicking on the project, and selecting “Import” from the options listed. This should display the window shown in the following image.
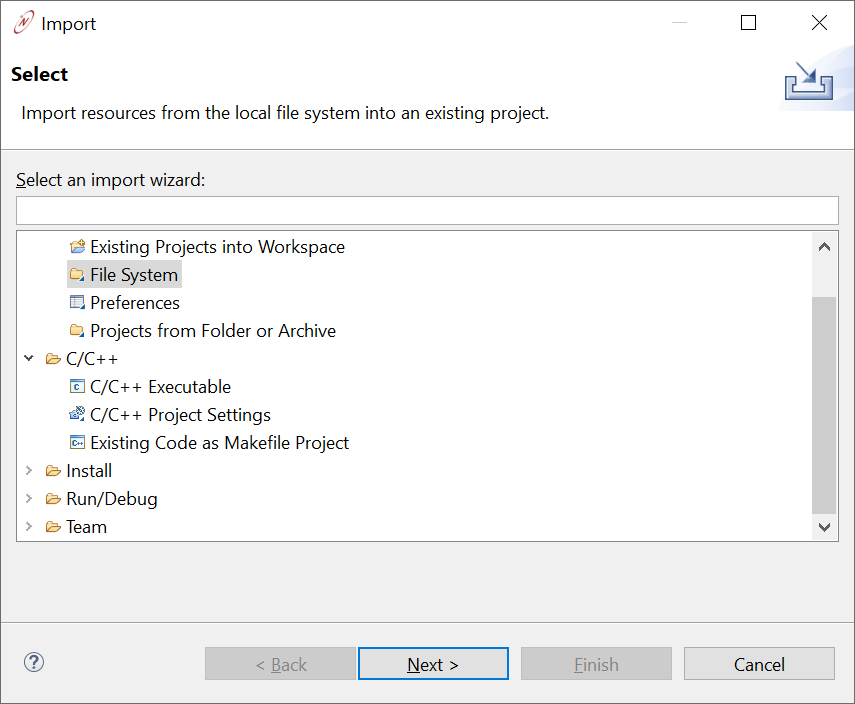
Select “File System” here and then click, “Next”. This should bring up the following window.

Click on the “Browse” button and select the folder that contains the source code. Make sure all of the files are included, and then hit the “Finish” button. You might be thinking that that’s all we need to do. Unfortunately, that’s not quite the case. Because we’re using Azure’s SDK, we need to make some additions to the directories that are included during compilation. Fortunately, this is pretty easy to do.
Once again, you’re going to right click on your project, and select the last menu option that shows up, “Properties”. From the Properties window that is displayed, click on “C/C++ Build”->”Settings”. This will change the inner window to that shown below.

From the menu on the left side in this inner window select “GNU Compiler”->”Includes”. You’ll need to add the following entries to the “Include Paths” using the paper icon with the green plus sign on it:
"${workspace_loc:/${ProjName}/src/azure-sdk/c-utility/inc}"
"${workspace_loc:/${ProjName}/src/azure-sdk/iothub_client/inc}"
"${workspace_loc:/${ProjName}/src/azure-sdk/deps/umock-c/inc}"
"${workspace_loc:/${ProjName}/src/azure-sdk/deps/azure-macro-utils-c/inc}"
"${workspace_loc:/${ProjName}/src/azure-sdk/deps/parson}"
"${workspace_loc:/${ProjName}/src/azure-sdk/umqtt/inc}"
"${workspace_loc:/${ProjName}/src/azure-sdk/c-utility/pal/generic}"
"${workspace_loc:/${ProjName}/src/azure-sdk/uamqp/inc}"
"${workspace_loc:/${ProjName}/src}"
Now, do the same for the Include Paths listed in “GNU C++ Compiler”->”Includes”. With these set, your application should finally build correctly. If you didn’t do it above, there’s one last change that we need to make, which was mentioned previously. That’s to set the proper value to the variable connectionString. If you still need to do this, go ahead and do it now. This variable is located in src\post-record-data.cpp.
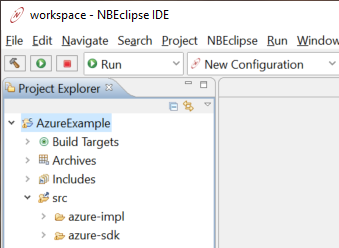
You’ll know you’re build was successful if you see the following in the console window:

At long last, we’re ready to load our application.
Load the Application
If you already set the IP address during the project creation wizard, you will be able to load your application to your module by hitting the Run button in the upper right corner of NBEclipse.
If you didn’t set the IP address or you need to change it for some reason, you can set a new IP address for your project by right clicking on it, then selecting “Properties”. From the Properties window, choose “NetBurner Options”, and then set the IP address in the corresponding field, as shown below.

Once this project starts running, it will automatically try to connect to the service, which brings us to…
Testing
Now comes everyone’s favorite part… as long as it works. As we mentioned above, once your application is successfully loaded and the device boots, you’ll see it start to try and connect. If it’s able to, it will start printing out publishing messages. It should look something like this:
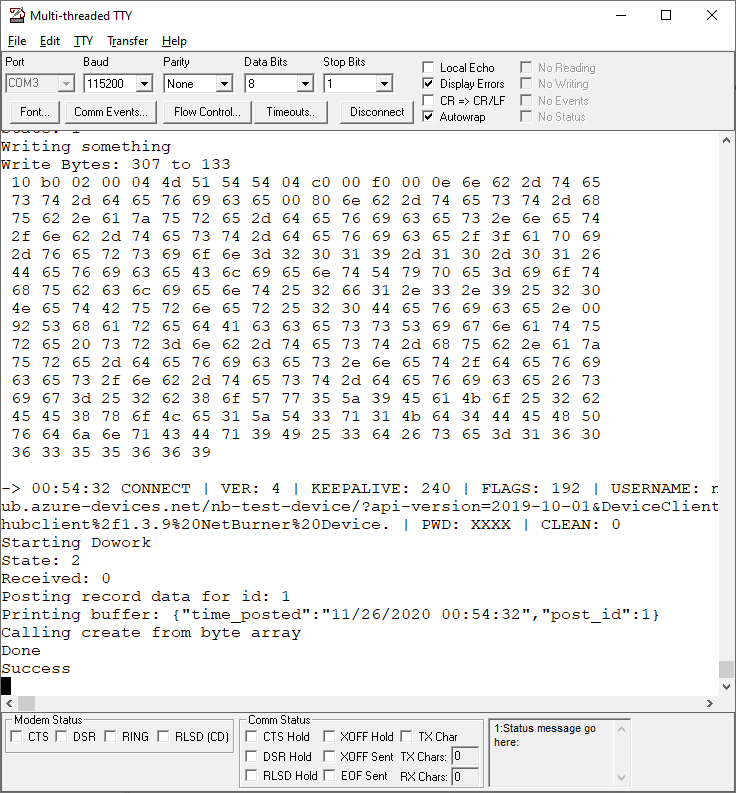
This will repeat over indefinitely, sending a new message every five seconds. To verify that our messages are getting received and properly transmitted, it’s time to head back to the Azure Portal and see if we notice anything coming in.
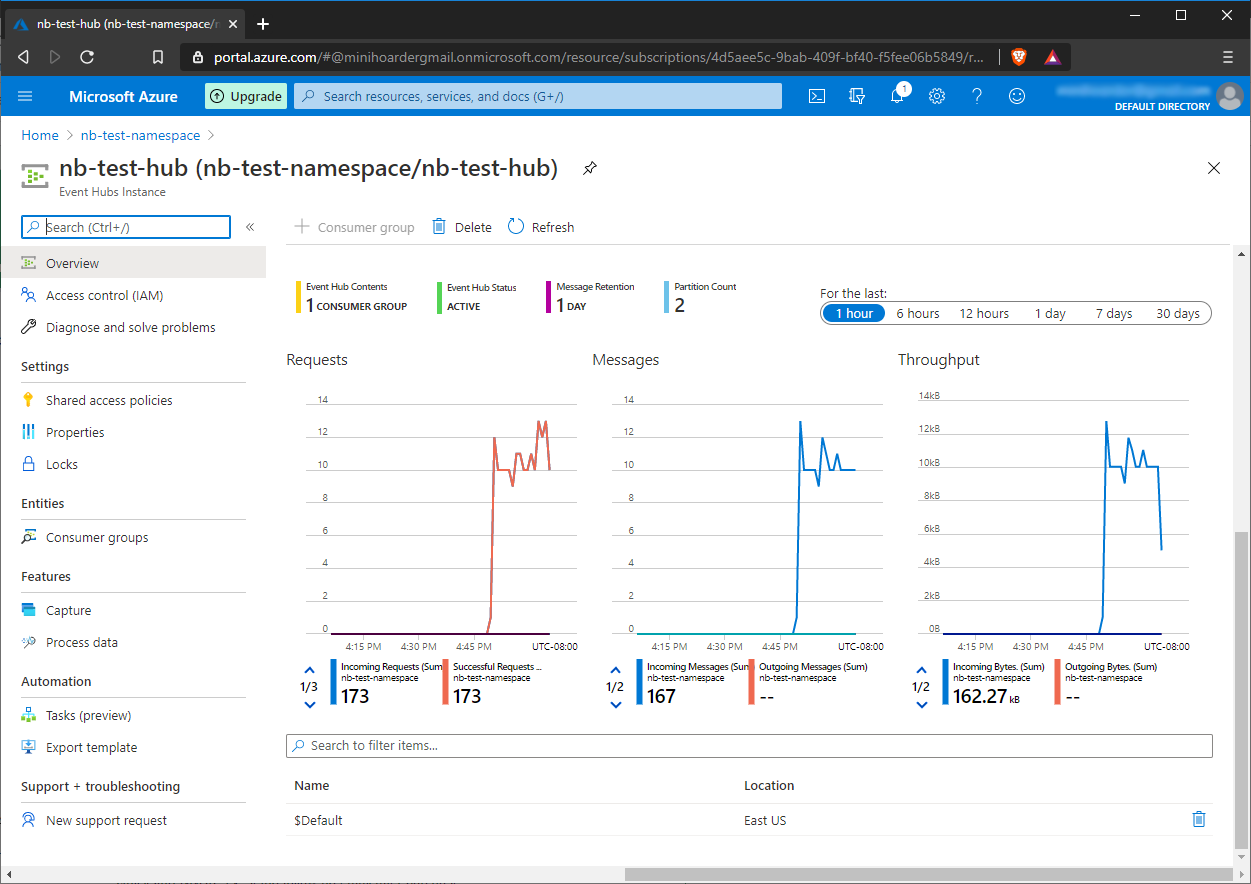
To test the overall input, we’ll head straight to the Events Hub Instance that we created, nb-test-hub. This is located in the Events Hubs Namespace that we created, nb-test-namespace. From the main panel for nb-test-hub, scroll down until you see three graphs labeled “Requests”, “Message”, and “Throughput”. If the device is connected and the messages are getting routed properly, you will start to see data coming in on these graphs, and they will no longer be blank. If you don’t see anything right away, don’t panic. It can take a few minutes for this to start to reflect changes.
Congratulations! You made it!
Where to go from here? Well, that’s really up to you! There are a wealth of services that Azure provides which can retrieve this data and process it however you see fit. These services (and how to use them) are a bit beyond the scope of this tutorial, however. From here, we would suggest taking some time to review the extensive Azure documentation and see how its services can best be applied to your specific use case.
Wrapping Up
We hope you’ve found this tutorial useful. Stay tuned for the second article in the series, where we dig into the code running on the MODM7AE70, and show how you can modify it to fit your needs. We’ll also explore how to troubleshoot any issues that might have come up while trying to get everything running.
If you’ve been able to use this tutorial in your project, please let us know! We love hearing how our devices are used in the real world, and would love to hear more about what you’re building. As always, if you have any thoughts or questions, please feel free to leave them below in the comments section. If you’d rather reach out to us directly, you email us at sales@netburner.com and we’ll be sure to respond to your request as quickly as possible.
4 thoughts on “How to Connect Your Embedded System to Azure IoT Hub with MQTT”
You can use the OPC Router to connect your production systems with the Azure Cloud via MQTT in a graphical way.
Are there any chances to see full AzureRTOS support in Netburner devices now that Microchip is licensing this for free use?
Hi Anguel, thanks for the question! We don’t currently have any plans to support another RTOS on our hardware at the time. We have a highly-optimized inhouse RTOS that we are continuously developing and improving. I’ll be sure to bring it up with our other engineers and see if this might be a possibility we can explore down the road, though. Please don’t hesitate to let us know if you have any other questions. =)
I was wandering around here to see if I could use the library to connect to another broker … but I think the library is somewhat specialized. The problem that I found when using Azure IoT, AWS IoT, Google IoT is that they are somewhat expensive solutions, I mean, it saves you a lot of work and obviously gives you all the guarantee that it will be working almost all the time … but For small companies or those that are just starting, sometimes it is better to implement it on your own server. I have tried open source solutions and they are quite robust.