|
Quick Start Guides
|
|
Quick Start Guides
|
There are several ways to configure your device to connect to a network. The default setting for a NetBurner device is DHCP. If a DHCP server is available on the local network the device IP settings will be configured automatically. If DHCP is not available, you have the option of assigning static IP settings, using the AutoIP address, or using the IPv6 Link Local address. Each of these options are described in the following sections.
When the factory application boots it will attempt to obtain a DHCP address. If you are connected to a network with a DHCP server, the device IP address, mask, gateway and DNS sever should be configured automatically. If your PC is on the same DHCP network you will be able to communicate with the device.
If the module is plugged in to a network that without a DHCP server, you have the option of configuring the IP settings statically. At a minimum you need an IP address and mask. If you need to route off the local area network you will also need a gateway and DNS. Static addresses should be assigned by your network administrator in order to avoid conflicts. The IP settings of the PC you use to connect to the device must be on the same subnet.
The default factory application is capable of AutoIP negotiation. AutoIP enables a device to automatically configure its IP address in the absence of a central DHCP server and without the need for a static IP address. By default AutoIP addressing starts in the 169.XXX.XXX.XXX address range. The network interface of the PC must also be set to the AutoIP range. Rather than assigning a value, if you set the address mode of the network interface to DHCP, the PC should default to it's own AutoIP addresss when it detects a DHCP server is not available.
Your NetBurner device will have at least three Addresses:
Additional IPv6 addresses are possible if your network has an IPv6 router or DHCPv6 Server that assigns additional IPv6 addresses.
The following methods can be used to determine the IP address of your device:
Please refer to the sections below for details on each method.
The recommended option is to locate your device using our online discovery service. You can do this by opening a browser and navigating to https://discover.netburner.com. This webpage should load a table that shows devices on your local area network which are running applications built with NNDK 3.x. From this table, you can access the web interface served from the device by clicking on the link in the "Web Page" column. To access a device's configuration record, click on the link in the "Config" column.

If you don't have internet access from your location, you can run our utility, Local Discovery. This program is available from our tools in <NNDK Install>\pcbin\localdiscover.exe, and sends out a request to all NetBurner devices on the local network. It opens a browser page on the first device to respond that lists all of the discovered devices, or a page that shows that no devices were found.
Local Discover will attempt to check each network interface on the PC. For each interface it will first check the IPv4 subnet, followed by AutoIP and finally IPv6. The factory default setting for IPv4 addressing is DHCP.
Important: If you are using a direct direct Ethernet connection between your PC and NetBurner device, a DHCP server will not be available (unless you happen to be running one on your PC) and the device's primary IPv4 address will be 0.0.0.0. However, the AutoIP and IPv6 addresses will still be active. If your PC's Ethernet interface is set to DHCP, both the PC and device will use AutoIP addresses. If your PC's Ethernet interface is set to a static IP address (e.g. 192.168.1.10), Local Discover will use the device's IPv6 Local Link address.
You can see which address is being used by inspecting the URL field of the web browser. For example, if IPv6 was used the URL would look like: [fe80::203:f4ff:fe0b:xxxx]:20034/DISCOVER.html. If AutoIP: 169.254.xxx.xxx:20034/DISCOVER.html. If your PC has a static Ethernet IP setting and you see an AutoIP address in the URL of the web browser, there may be caching issues. Close the entire web browser application, reset your NetBurner device, wait 10 seconds, then execute localdiscover.exe again.

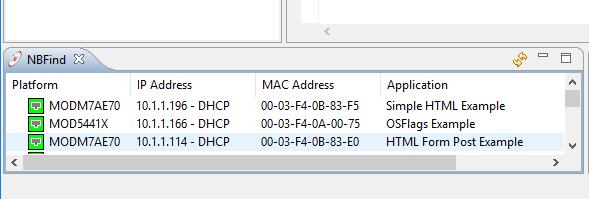
Another option to find the IP address of your device is to use the NBEclipse IDE. As before, ensure that your device is powered on and plugged into the same network as your PC. Open NBEclipse, and in the bottom left of the workspace, NBFind can be found running. NBFind lists the IP, application, and MAC address of all NetBurner devices on your local network.
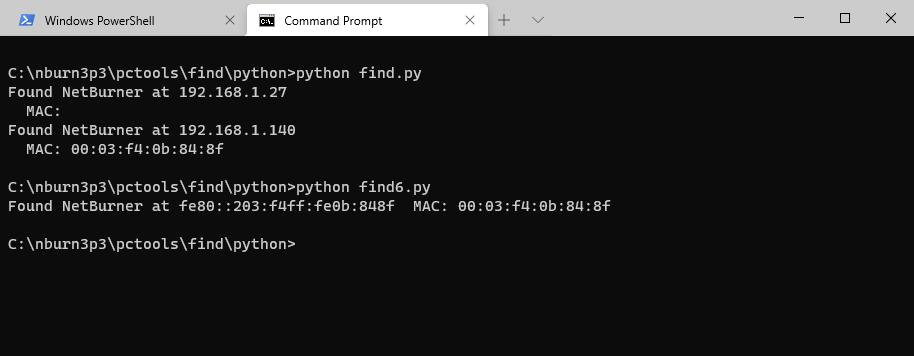
Device Find utilities written in Python are located in your installation directory: "\nburn\pctools\find\python".
A final option is to use the included utility IPSetup. If the device is powered on and plugged into the same network as your PC, run IPSetup. This application shows all NetBurner devices on your network. Be aware that as of NNDK 3.x, IPSetup can not be used to configure your device. Our configuration system now handles this, as described later in this guide.

You can find the IPSetup tool on our website, here.
Note: If these options are failing, there may be a firewall issue blocking the applications from sending the UDP broadcast that is used to locate NetBurner devices. Always grant NetBurner applications the ability to get through your OS firewall and ensure that UDP port 20034 is open for use.