 |
NetBurner 3.5.8
PDF Version |
|
NetBurner 3.5.8
PDF Version |
Device discovery and configuration can be accomplished in a number of ways, including methods that are platform independent, including Windows, macOS, Linux, tablets and mobile phones.
\nburn\pcbin\localdiscover. This is a multi-platform utility written in Golang for Windows, macOS and Linux. The compiled version can be distributed to your customers, but not the Golang source code.\nburn\pctools\find.The primary configuration method is through the device's Configuration Web Server. By utilizing a web server, a device can be configured from any platform or operating system. The underlying configuration mechanism is handled through a JavaScript Object Notation (JSON) object. This will be described in more detail later, but the important point is that it provides a simple interface that can be used by non-embedded developers (e.g. web developers) to interact and configure the device. The implementation is also designed to enable you to add any application specific information to be stored and accessed in the same manor, such as calibration values, set points, etc.
You are also able to create your own configuration web interface that will appear in place of the default interface. In this way you can organize and present data in the appropriate way for your customers, as well as add your own custom logo, images and descriptions. Examples are provided.
discover.netburner.com. You will see a list of devices on your network. (If the device does not have Internet access, use the localdiscover utility instead).All system and application settings can now be viewed and/or modified by navigating the tree structure.
Using discover.netburner.com:

Using localdiscover utility:
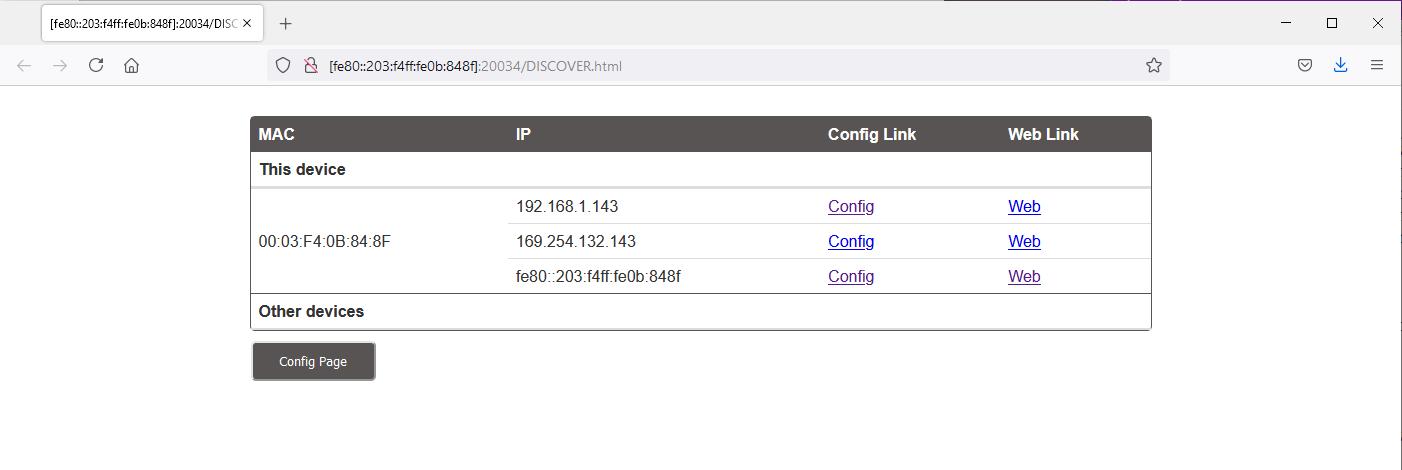
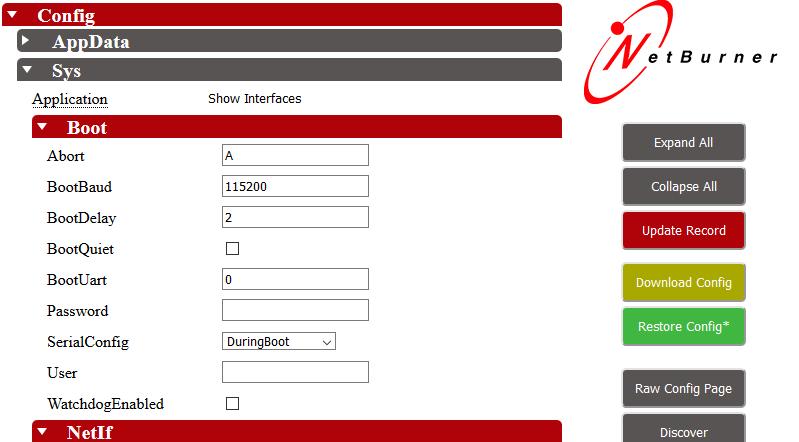
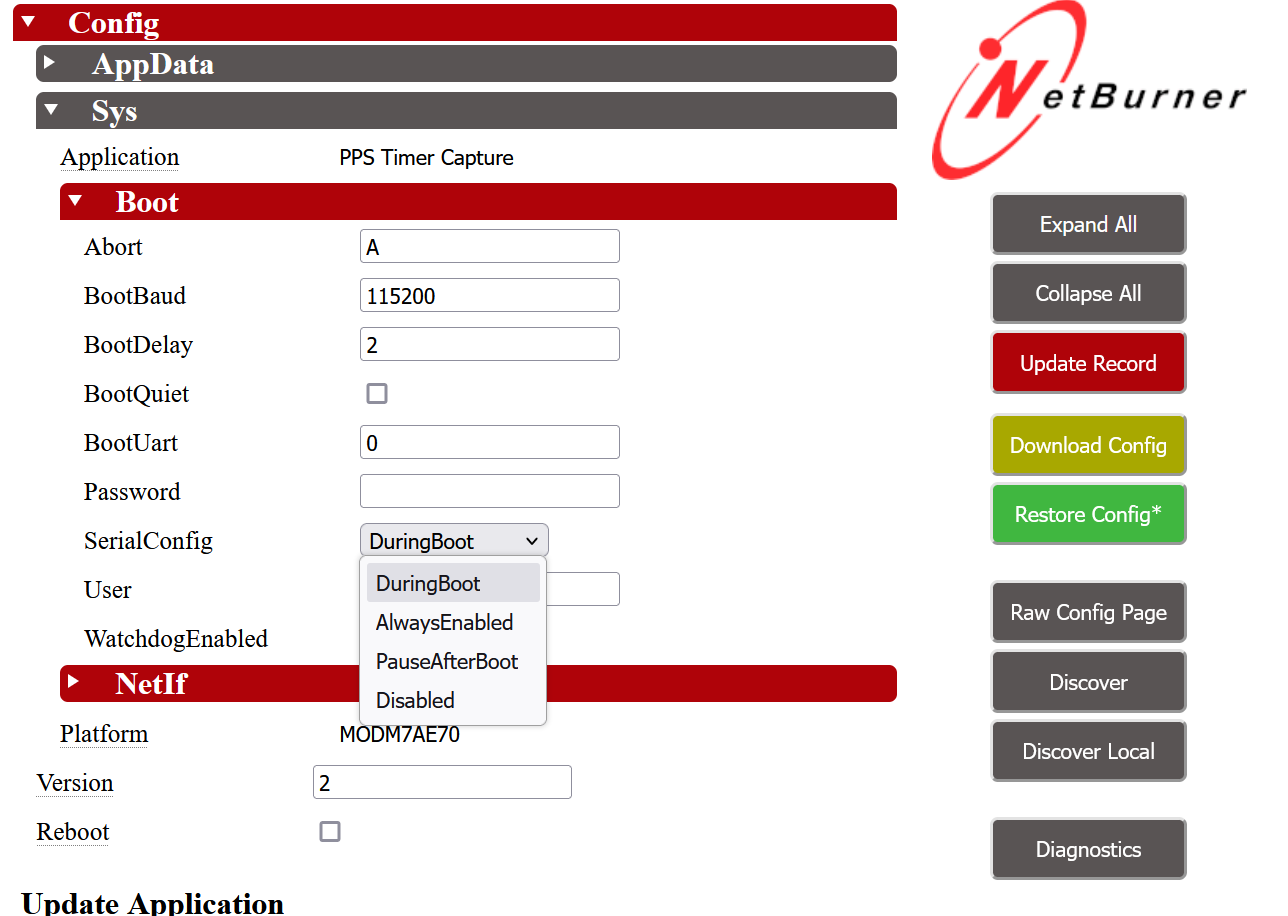
The "Device" link will take you to the device application web page. The "ConfigPage" link will take you to the device configuration web page, as shown below:

Top level configuation leaf containing System (Sys) and Application Data (AppData) configuration leafs. AppData will only be populated if an application uses the configuration system for storage/configuration of application specific items, as opposed to common system configuration settings.
| Setting | Description |
|---|---|
| Version | Configuration system write counter. Increments each time new values are saved. |
| Reboot | Check this option to reboot the system once new values are saved |
A new application can be programmed into the device by choosing an image file and selecting the "Send File" button. Note that the Reboot checkbox should normally be checked so that the device reboots and runs the new application that was sent.
System settings
| Setting | Description |
|---|---|
| Application | Name of running application. |
| Platform | Name of hardware platform, such as MOD54415 |
Boot settings.
| Setting | Description |
|---|---|
| Abort | Character or string to send to the boot serial port to abort the application boot process and enter the Serial Port Configuration interface. Default is 'A'. |
| BootBaud | Boot serial port baud rate. Default is 115200, N, 8, 1. |
| BootDelay | Number of seconds to delay starting the application. This is the time available to send the Abort character or string. Default is 2 seconds. DO NOT SET TO 0. |
| BootQuiet | At power-up the boot serial port will send the message: "Waiting 2 seconds to boot..." Enabling quiet boot will disable this message. Default is off. |
| BootUart | Designated boot UART number. Varies by platform, but typically default is 0. |
| User | Optional user name for password protection of the web page interface. |
| Password | Optional password to access the web page configuration interface. |
| SerialConfig | Boot options for the Serial Port Configuration interface: - During Boot (default) - Always Enabled - Pause after boot - Disabled |
The NetIf section contains settings for all available network interfaces. For example, if the system has a single Ethernet interface, there will be a section named Ethernet0. If there are two Ethernet interfaces, the second will be Ethernet1. If a Wifi interface is available it will be listed as well.
Settings for each Ethernet interface
| Setting | Description |
|---|---|
| DeviceName | Interface name used for DNS and NetBIOS |
| DhcpDiscoverSec | Number of seconds after boot to wait before sending a DHCP Discover message. Default is 1. |
| DiscoveryObfuscate | Send data to Discover Server obfuscated rather than plain text for security. Default is enabled. |
| DiscoveryReportInterval | How often to report to Discovery Server in seconds. Default is 900. |
| DiscoveryReportUrl | Name of Discover Server. Default is: discover.netburner.com/DevicePost. |
| MAC | MAC address |
| SupressDefault | Disable Ping and UDP Echo ports. Default is not supressed. |
| VlanTag | Virtual Network tag number. Default is 0 |
IPv4 network interface settings.
| Setting | Description |
|---|---|
| ActiveAddr | Current IP address. |
| ActiveDNS1 | Current DNS1 address. |
| ActiveDNS2 | Current DNS2 address. |
| ActiveGate | Current Gateway address. |
| ActiveMask | Current IP Mask. |
| AutoIPAddr | Auto IP address. |
| AutoIPEn | Enable AutoIP feature. Default is enabled. |
| EnableMacmDNS | Enable device access by name in the format: nburnxxxxxx.local, where xxxxxx is the last 6 digits of the MAC address. Default is disabled. |
| LocalName | Specify device access by name in the .local format. For example: mydevice.local. |
| Mode | IP Address Mode: - DHCP (default) - DHCP with fallback to static - Static - Disabled |
| StaticAddr | Static IP address. |
| StaticDNS1 | Static DNS1 address. |
| StaticDNS2 | Static DNS2 address. |
| StaticGate | Static Gateway address. |
| StaticMask | Static IP Mask. |
After boot, the first DHCP Discover message will be sent once the network link is active. Note that if the network link is not active, such as when a network cable is not connected, DHCP will not start, and the fallback to a static address will not occur.
Once DHCP starts it will attempt to get the IP settings from a DHCP server. If not successful, it will retry 4 more times at 8, 16, 23, and 64 seconds. If not successful, then the fallback to static IP address settings will occur.
For custom applications, the retries can be modified in the DHCP Client header file (may be moved to constants.h in a future release). The defaults are shown below:
IPv6 network interface settings main leaf. Note: refer to DHCP With Fallback Details section above.
| Setting | Description |
|---|---|
| Mode | IP Address Mode: - DHCP (default) - DHCP with fallback to static - Static - Disabled |
| StaticAddr | Static IP address. |
| StaticDNS1 | Static DNS1 address. |
| StaticDNS2 | Static DNS2 address. |
Displays a list of active addresses. The number will depend on the network architecture. All devies should have at least a link local address with prefix fe80::. Other addresses can be assigned from a DHCPv6 server and routers on the network. The example below shows link local, DHCPv6 and a router.
Displays a list of active DNS serversaddresses. The number will depend on the network architecture. All devies should have at least a link local address with prefix fe80::. Other addresses can be assigned from a DHCPv6 server and routers on the network. The example below shows link local, DHCPv6 and a router.
Displays a list of active DNS servers.
Displays a list of active router addresses.
It is not necessary to understand the underlying JSON implementation, but for those that are interested a sample JSON object is shown below. It identifies each configuration field, which can range from a string, boolean, or a selection of values. For developers, the programmers guide and examples provide the operational details.
The root of the object is Config. The next levels are AppData and Sys. AppData is available for your application to store information. Sys is used for the system configuration such as IP settings.
If you were writing a web interface and need only the data under Ethernet in the tree, it can be accessed by: http://10.1.1.71:20034/UI.html?CONFIG/SYS/NETIF/Ethernet
To obtain just the IP address: http://10.1.1.71:20034/UI.html?CONFIG/SYS/NETIF/Ethernet/IPv4/ActiveAddr
Recommended Examples: The following examples are recommended to begin evaluating the platform. They are located in the \nburn\examples directory.
\Configuration\Web\BasicWebConfig
One of the features of NetBurner 3.0 is that each device is configured though its own configuration web interface. Data sent and received through the network interface has three options for security:
Network connectivity is not required to use your NetBurner device. If enabled, the Configuration Server can be accessed through the device's serial port. The configuration tree is exactly the same as what you see on the web interface and in the JSON object. For example, the Ethernet0 settings are located at Config > Sys > NetIf > Ethernet0.
The serial port interface is located on UART0 by default. It can be modified and enabled/disabled in the Config > Sys > Boot level of the Configuration Server.
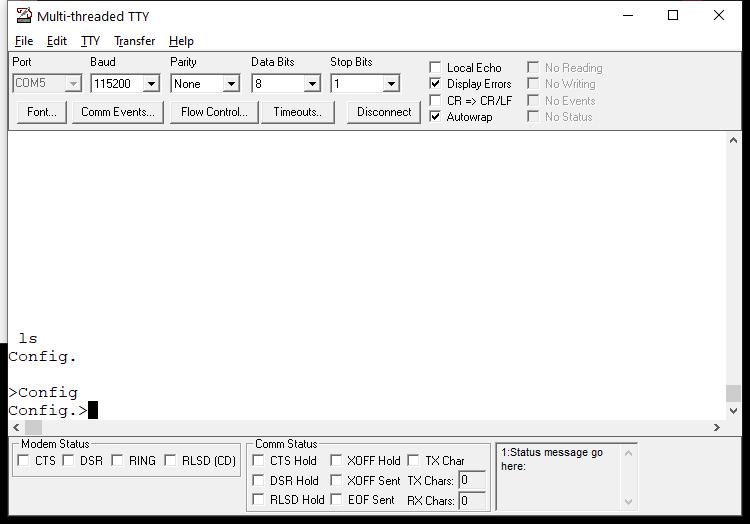
To access the serial port configuration:
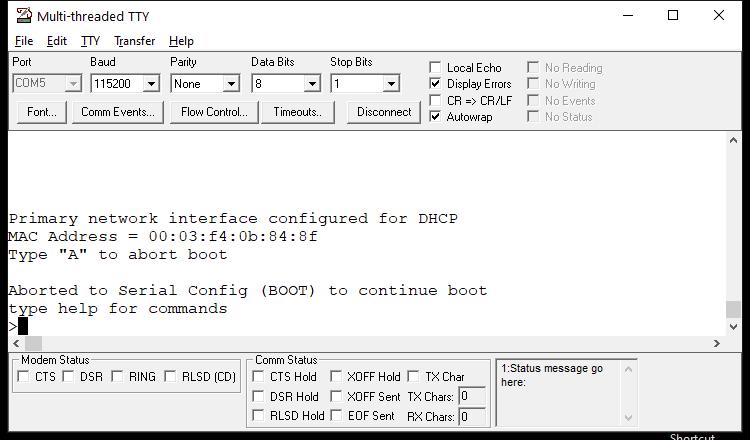
You are now in the serial configuration mode as indicated by the '>' character. Typing "help" will display the help menu.
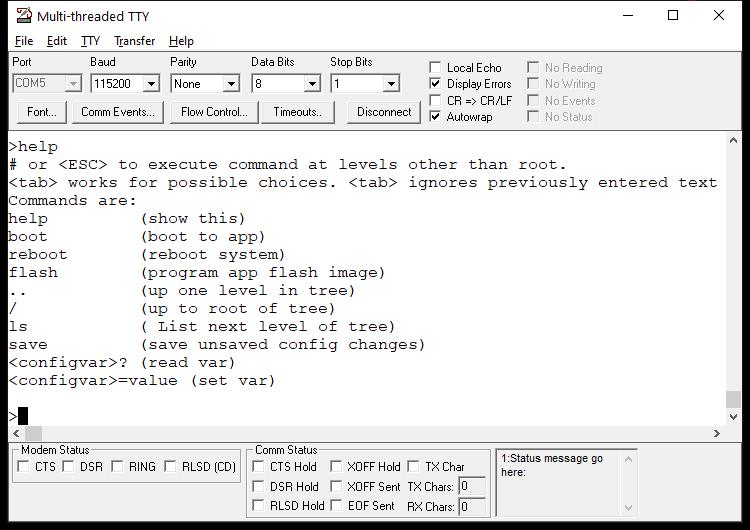
Typing the "ls" command displays the next level of the tree, which is Config since we are at the root level. In this example we will set the Static IP values. Note that to change from DHCP to static, we must also change the Mode option from DHCP to Static. To navigate to the next level you type in the name of that level. For example, to go to the Config level:
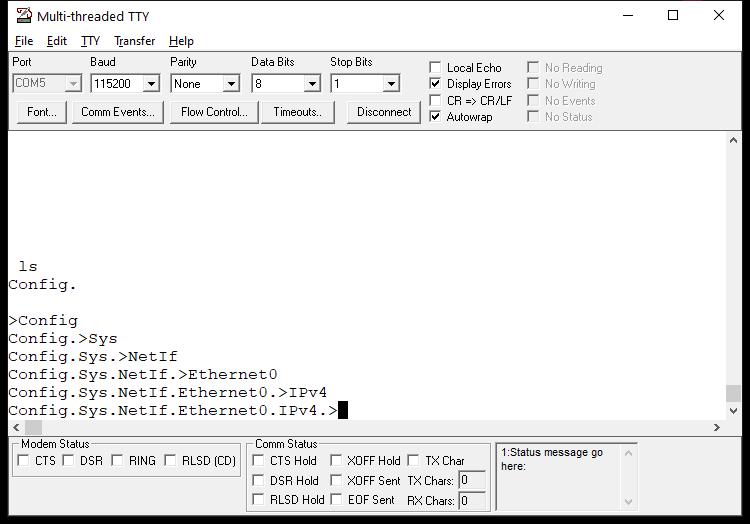
The prompt will show the current location, in this case Config>. In the same manor to navigate to the IPv4 settings the level names are typed into the terminal. Note that tabbed auto-completion is also available.
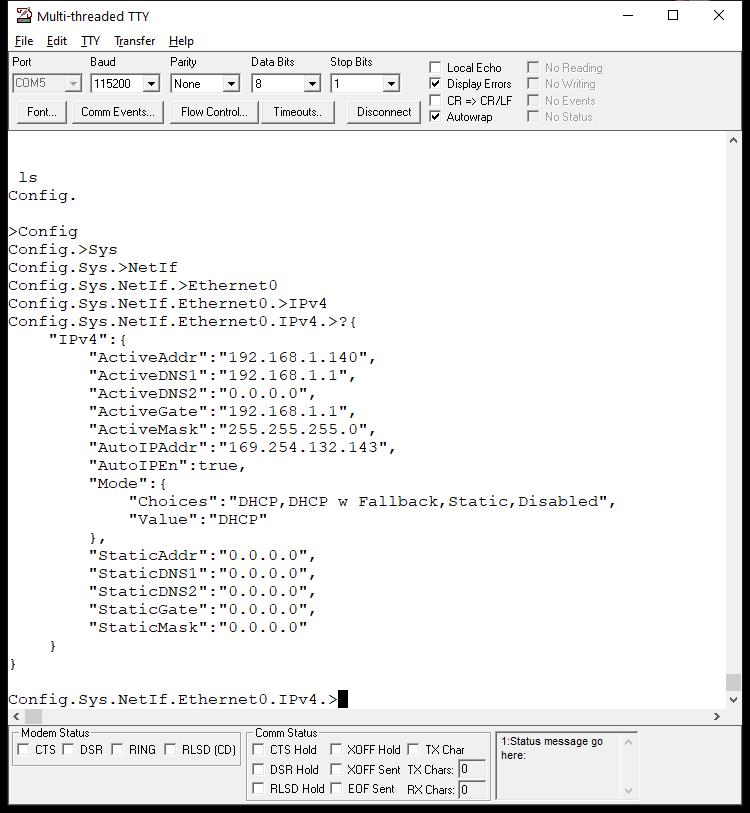
At any level, typing a "?" will display the current values of that level and all levels beneath in the JSON object format. For example:
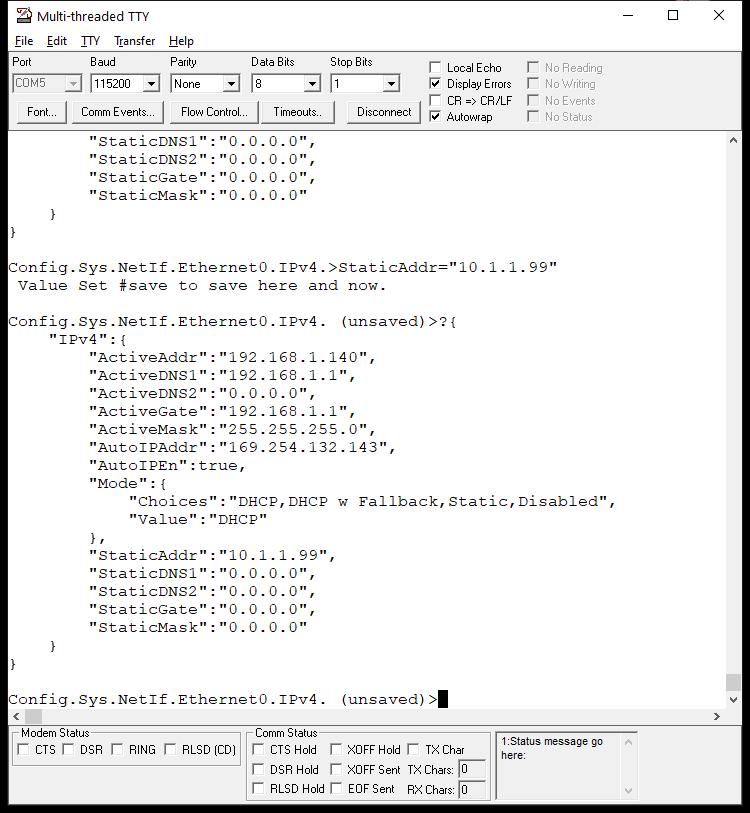
In this example we are interested in the static IP settings. There are two choices to set them: from the IPv4 level by including the name of the next level and the value, or by going down to each level individually and entering just the value. In this case we will stay at the IPv4 level and include the name of the static item we want to set. To set the StaticAddr type: StaticAddr="10.1.1.99". We will also type a "?" to see the changed value:
In the same manor we will set the Mask, Gateway and DNS. To set the Mode we will need to either include the Mode level in the setting string or go to the Mode level, since the setting is a Choices selection and not a simple string like the static IP settings. To accomplish this from the IPv4 level type: Mode.Choices="Static". If you navigate the to Mode level, the command would be: Choices="Static". At this point the unsaved settings are:
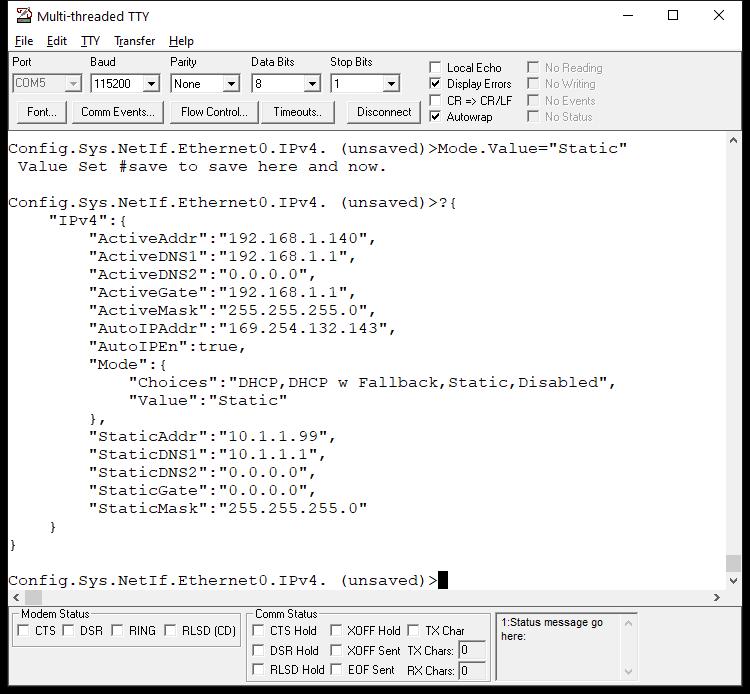
Mode selector control has two settings: Choices and Value. The Choices are values that appear in the web page selector control and you do not want to modify them. Only modify the Value to one of the Choices values.To store the modified values in the Configuration Record in Flash memory, type #save. This will store the values, but the IP settings will not take effect until the device is rebooted.
Just as with the select file and upload feature of the web interface, applications can be uploaded to your device using the Serial Configuration Server.
The procedure is:
The serial terminal output is shown below:
The device is now waiting to recive the application image file. Use your serial terminal option to send a binary file, and select the .bin file of the application you wish to send. After the file is uploaded, the device will reboot. In the display below the flash command is entered, the file is sent, and the status messages confirming the programming was complete. The device reboot informatoin of the new application begins with "Primary network interface....".
As mentioned previously, the Serial Configuration Server behavior has four options:
The SerialConfig field is used to select the desired option. It can be done through the web page, or through the Serial Configuation Server itself. It is located in the Config > Sys > BOOT section of the tree.
From a serial termianl using the Serial Configuration Server itself. The example below uses the full path from the root, but you can also traverse the tree by entering each in succession: Config, Sys, Boot, SerialConfig. A '?' returns the JSON object's current setting and options.
Command Examples: